
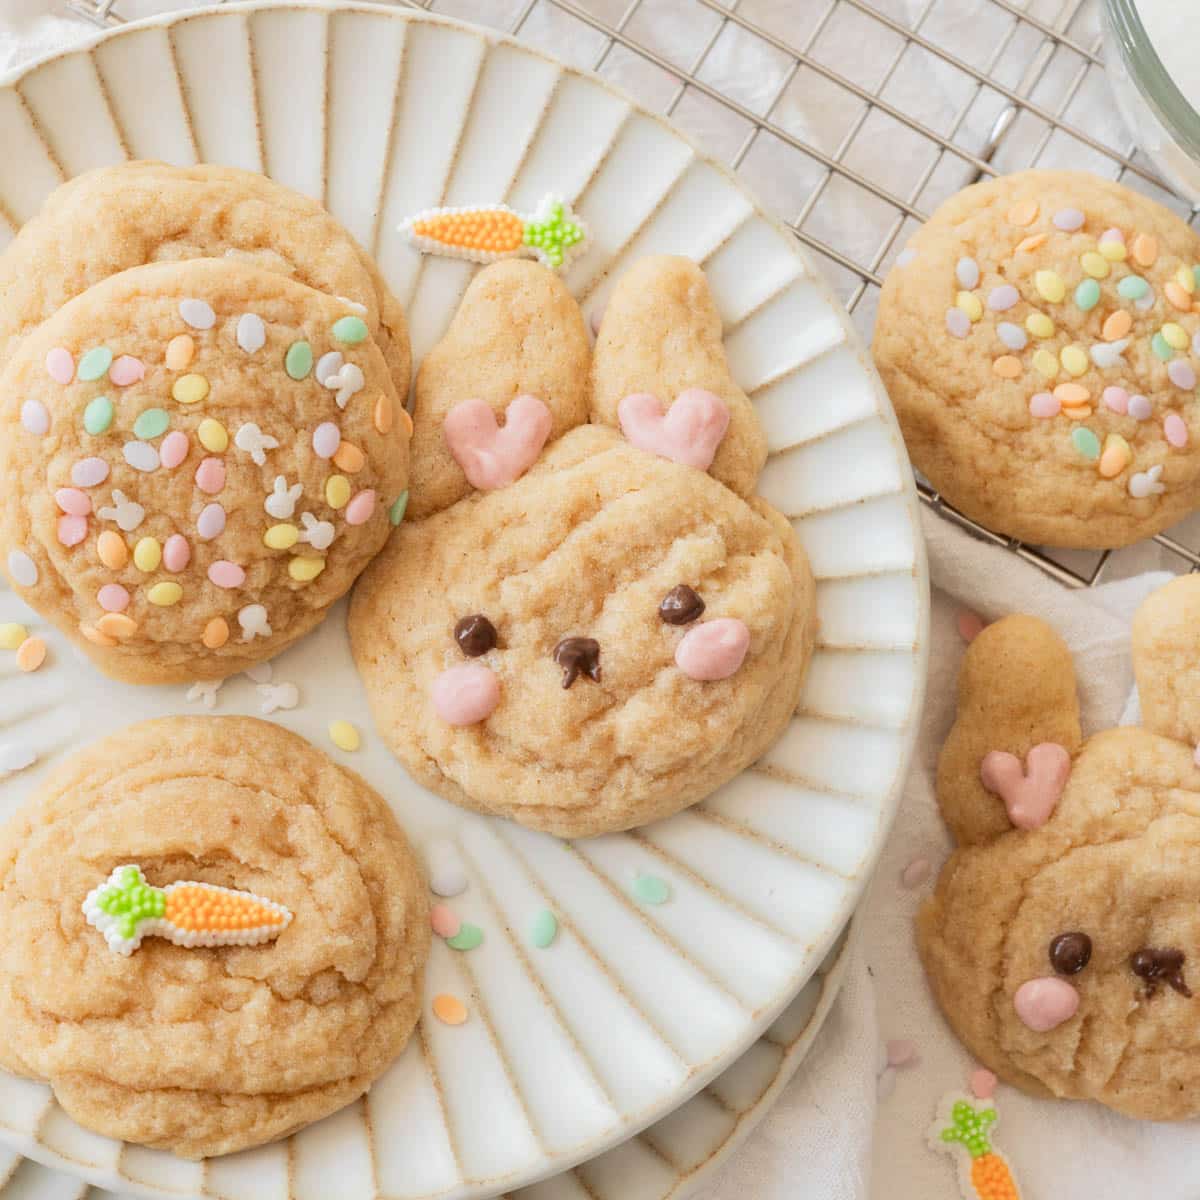
Soft, melt-in-your-mouth bunny sugar cookies! They’re super easy to make and a great way to celebrate Spring/Easter! 🙂
Disclaimer: This post contains affiliate links! Clicking the links are no cost to you at all, but they help me earn commission as part of my income. All of my affiliate links are for products that I truly love using, and wouldn’t share otherwise. Any clicks are really appreciated! <3

✉️ want to save this?
Why you’ll love these bunny sugar cookies
These cookies have been a top 5 recipe on my blog since I originally posted it in Spring of 2023. You’ll understand why after reading this post… and of course, after baking & eating them!
So, here are a few reasons why you’ll love these bunny cookies:
- This is a quick, easy recipe with no special equipment required. You don’t need a fancy mixer or even a hand whisk… you can just use a silicone spatula!
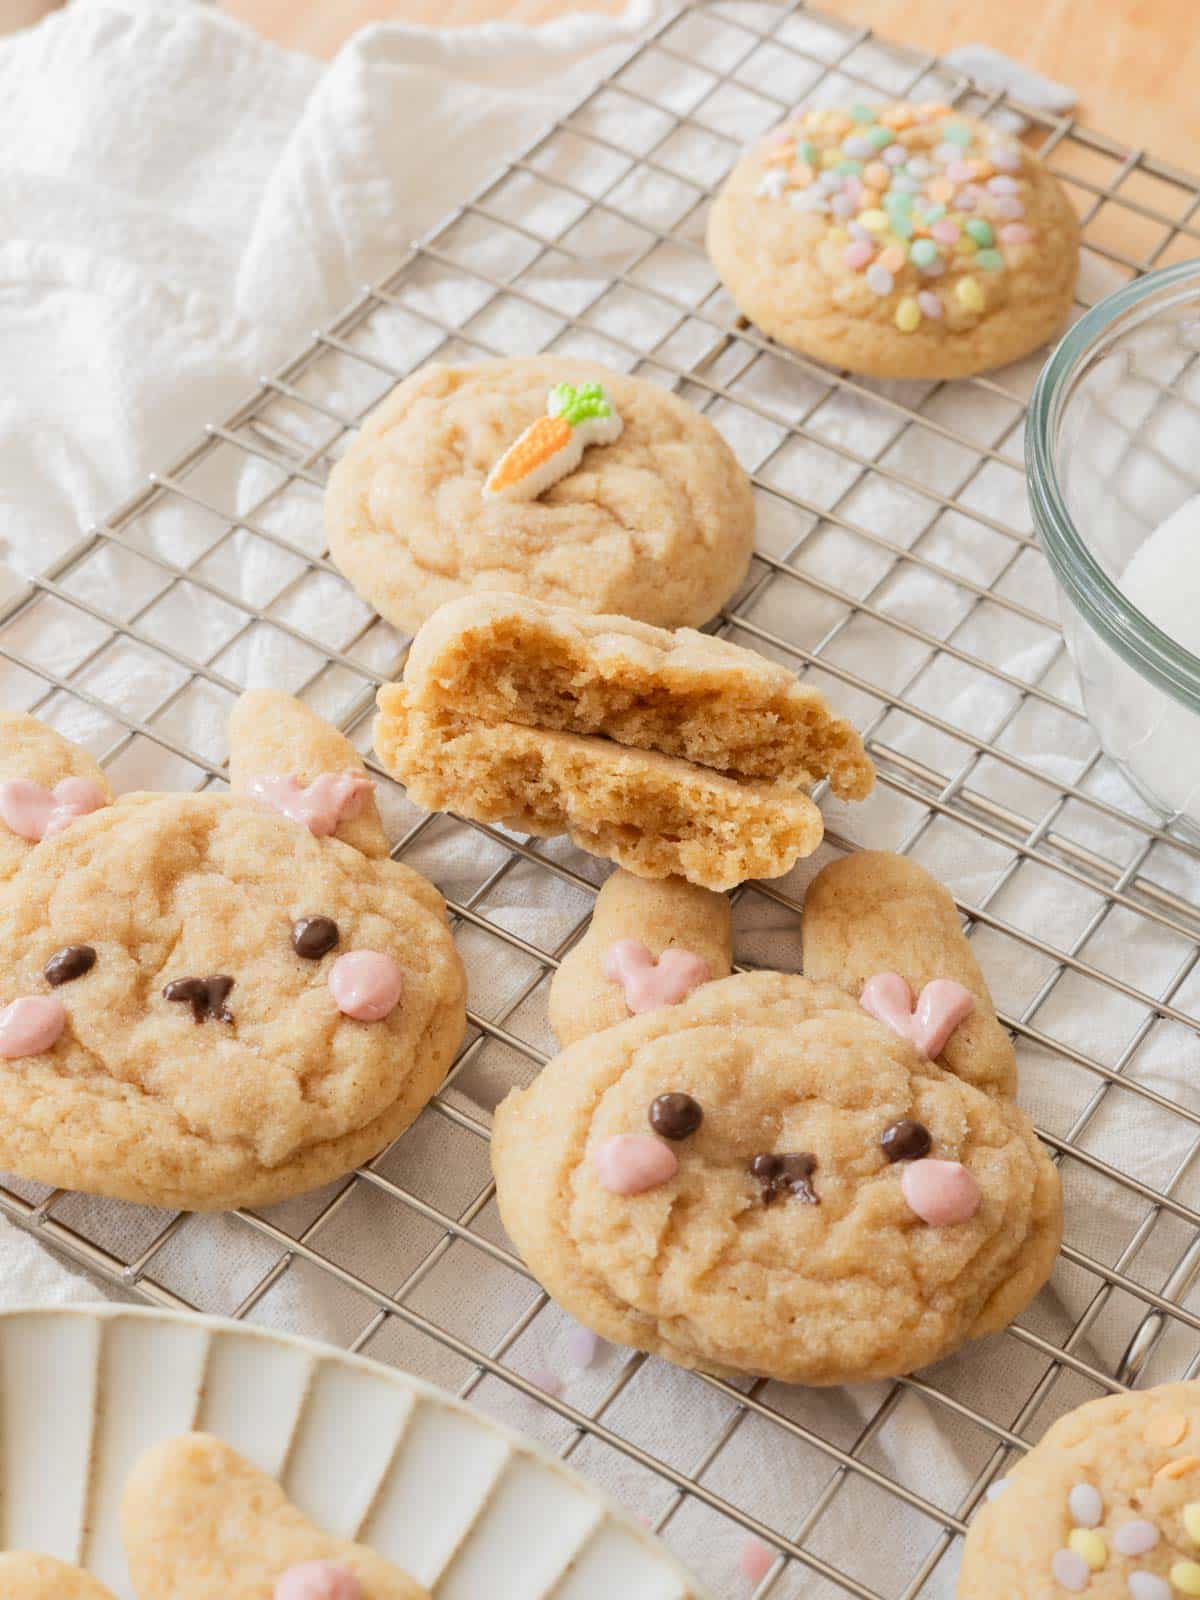
- They melt in your mouth. The cookies are SUPER soft and buttery. Kind of like those iconic store-bought sugar cookies, but better. But if you want them a bit chewier, you can bake them for a few minutes longer until edges are a bit golden brown.
- They’re not too sweet. Some sugar cookies can be waaay to sweet for my liking! These cookies are full of flavor, perfectly salted, and not too sweet. So yes, you can easily chow down a few cookies at a time without feeling too sugared out.
Equipment
for the cookie dough
- Small bowls or plates: So you can easily roll your cookie dough into sugar and sprinkles!
- Medium mixing bowl: This is for all of your dry ingredients.
- Large mixing bowl: To mix wet and dry ingredients together.
- Silicone spatula: Since the butter is melted, I didn’t even use a hand whisk or electric mixer… just my spatula!
- Small cookie scoop: My cookie scoop holds about 1 ½ tablespoons of dough.
- Cookie sheets
- Parchment paper
for the bunny decorations
- Small microwave-safe bowls: To melt the chocolate.
- Small silicone spatulas: For mixing the chocolate.
- Piping bags: You can alternatively use toothpicks or Ziploc bags.
- Scissors
Ingredients
for the cookie dough
- All-purpose flour
- Baking powder
- Baking soda
- Table salt: I use Morton.
- Unsalted butter: I use Vital Farms.
- Granulated sugar: For the cookie dough and for rolling.
- Light or dark brown sugar
- Egg
- Vanilla Extract
- Sprinkles: I used decorative carrot sprinkles and pastel sprinkles!
for the bunny decorations
- White chocolate chips
- Milk chocolate chips
- Oil-based food coloring (pink or red): When dying chocolate, you’ll want to use oil-based food coloring or else it will seize up and become lumpy. However, if you don’t have oil-based food coloring, you can try mixing in a tsp of neutral oil (canola, vegetable) at a time! The chocolate should come back together. Maaagic.
You can always opt for candy melts or my easy icing recipe!
How to make bunny cookies
- Mise en place: aka “put in place”. This French saying simply means measure out all of the ingredients and prep your equipment beforehand. This helps you stay more organized and move more seamlessly in the kitchen while you make these bunny sugar cookies.
- Mix your butter and sugars: Stir your melted butter, granulated sugar, and brown sugar until combined.
- Add egg and vanilla extract: Mix until smooth.
- Stir in dry ingredients: Stir in the dry ingredients until no dry spots remain.
- Scoop cookie dough:
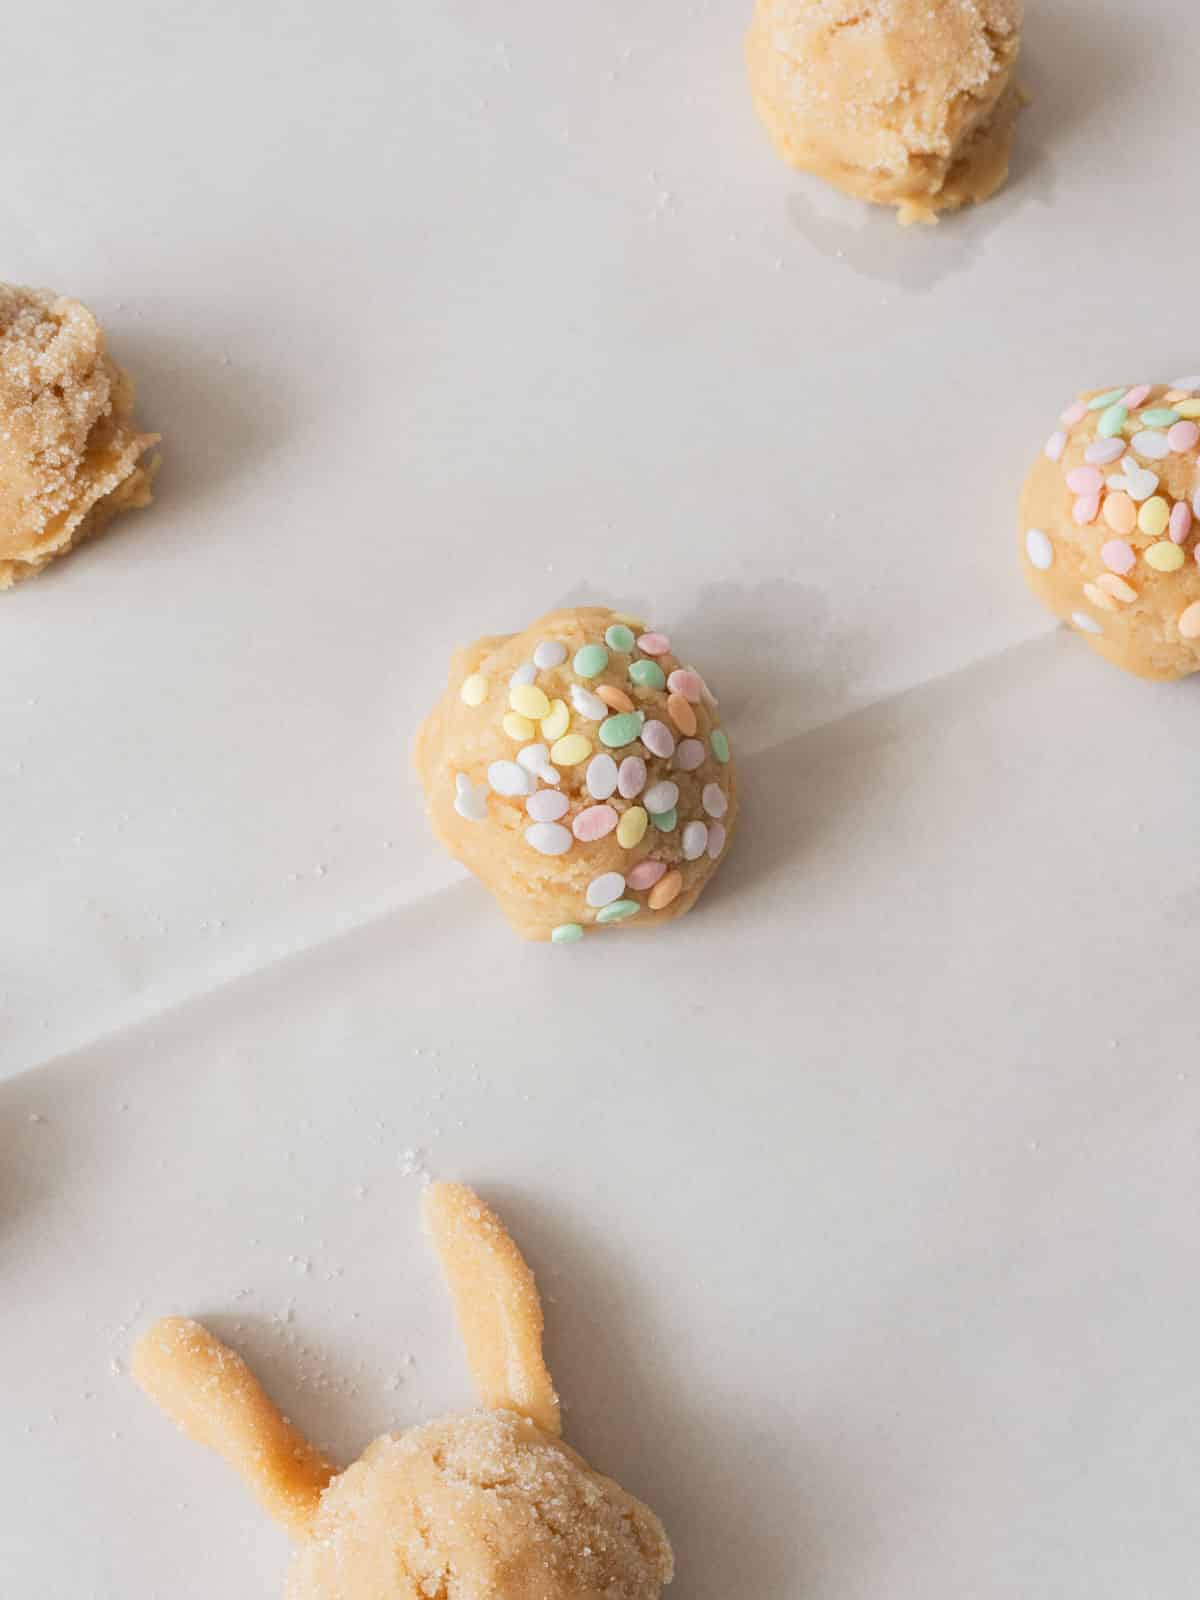
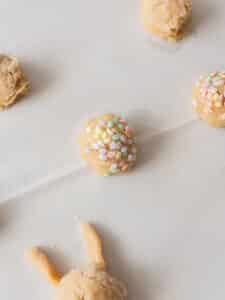
- For regular sugar cookies, scoop 1 ½ tbsp ball of dough, then roll into sugar. Place on baking sheet, 3-4 inches apart from other cookies.
- For sprinkle sugar cookies, scoop 1 ½ tbsp ball of dough and roll the tops into sprinkles. Place on baking sheet, 3-4 inches apart from other cookies.
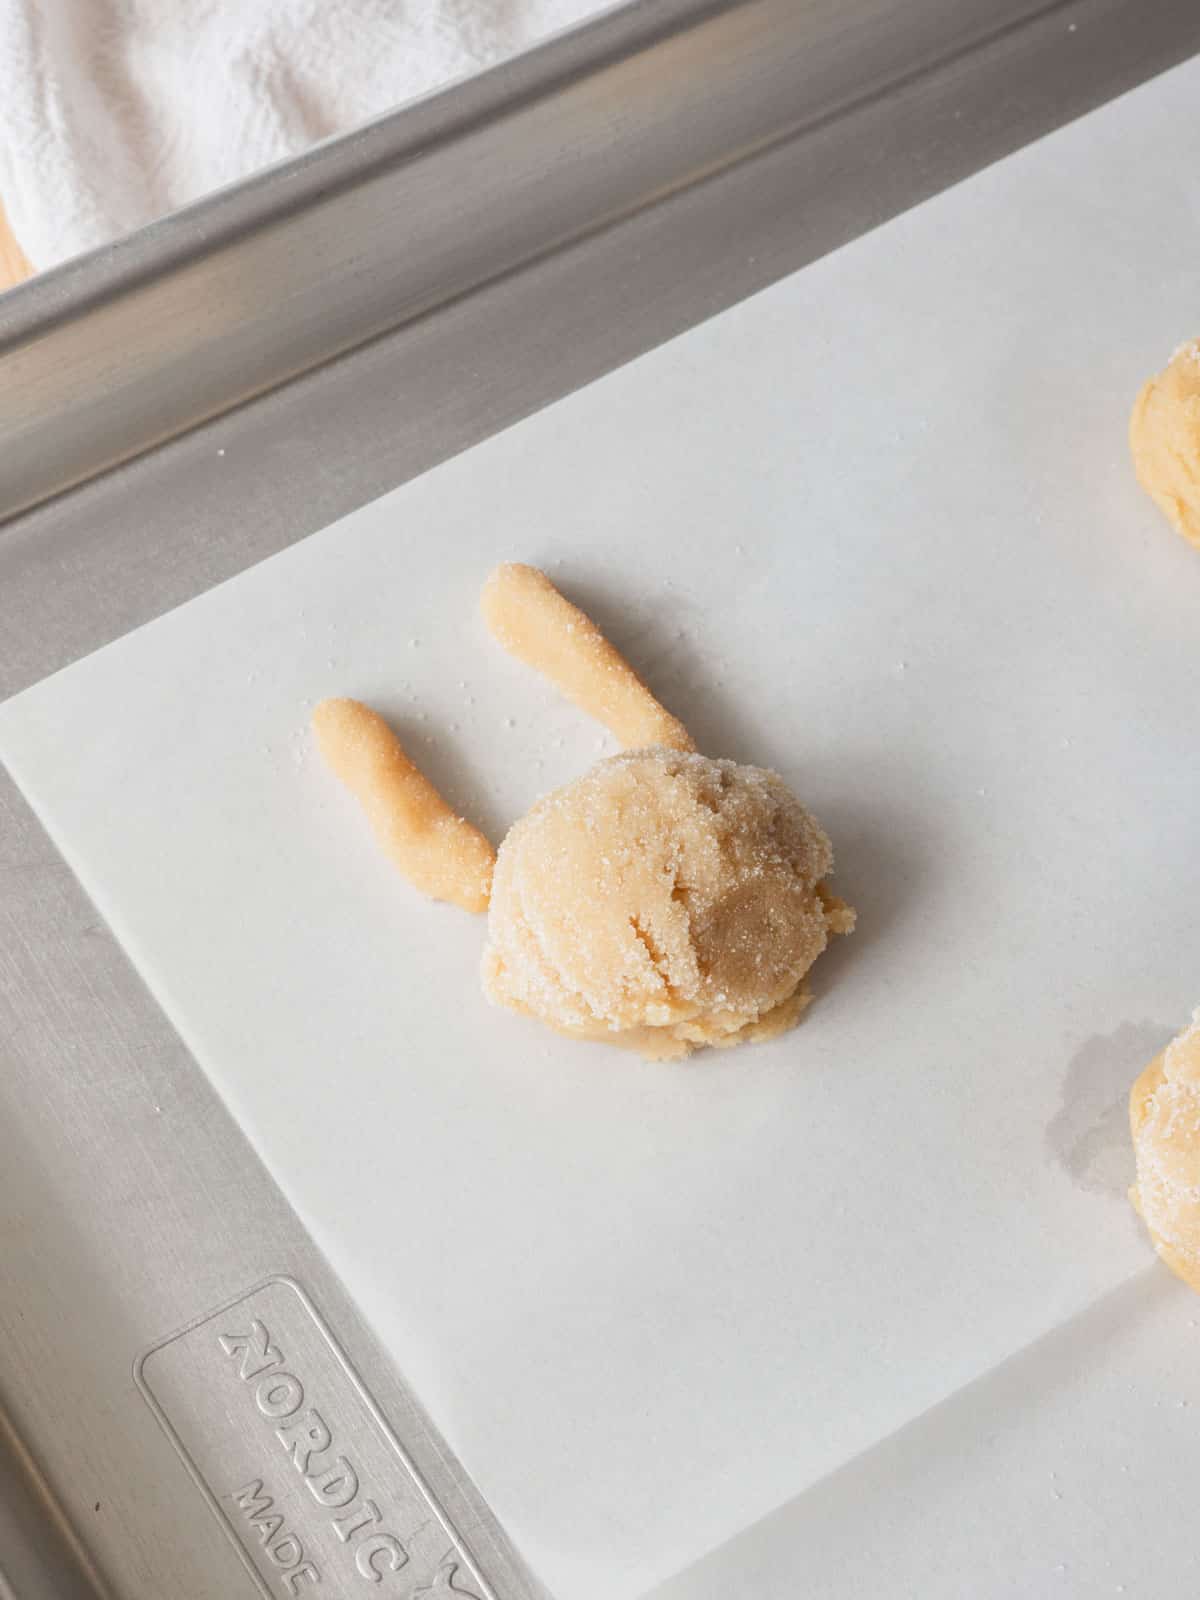
- For bunny sugar cookies, scoop 1 ½ tbsp ball of dough, then roll into sugar. Place cookies on baking sheet, spacing them apart by 3-4 inches. To make the ears, scoop about ¾ tsp of dough, shape it into a ball, and equally split it into two pieces. Then, shape each ball into ~1.25-inch thin logs, and place the ears on the top sides of the heads. Make sure the ears are a bit thin and have some space between each other so they don’t connect while baking.

- Bake: Bake sugar cookies for 9-11 minutes. For soft cookies, bake them until the edges are set and firm. For chewier ones, bake slightly longer, until the edges are a light golden brown.
- Note: If using decorative sprinkles (like the carrot one above), lightly press into freshly baked, warm cookie.
- Decorate: For bunnies, use melted chocolates to add faces.
- Store: You can store the cookies in an airtight container at room temperature for up to 7 days.
Tips
Making the cookie dough
- Use a kitchen scale: One of my favorite kitchen tools is a scale because it helps yield consistent results in baking. Measuring ingredients by weight is much more accurate rather than by volume (like using measuring cups). However, if you’re measuring your dry ingredients with cups, make sure you follow this tip: gently spoon in the flour into the cup until it’s full, then scrape the excess off using the back of a knife or offset spatula.
After baking
- For rounder cookies, immediately place a circle cookie cutter or mug (that is larger in diameter than your cookie) on top of a warm, oddly-shaped cookie. Move it around in a circular motion. This step, known as the “cookie scoot”, turns them into the more aesthetic, perfectly round cookies you see online! It’s not necessary, it’s purely for plating.
- For shaping baked bunny cookies, you can use a silicone spatula to move the edges of the cookie around to your liking!
- When dying chocolate for decorating, you’ll want to use oil-based food coloring or it’ll seize and become lumpy. If you don’t have oil-based food coloring, you can mix in a tsp of neutral oil (canola, vegetable) at a time! The chocolate should come back together. Maaagic.
FAQs
Yes, you can!
Instead of regular butter, you can swap in high quality vegan butter made for baking. Make sure to use a good brand—some brands are very high in water content and melt at lower temperatures, yielding very flat cookies. I recommend brands like Miyokos and Country Crock.
You can also omit the egg. First, follow the recipe up until you add the flour, baking powder/soda, and salt. Slowly mix the dry ingredients in. If the dough seems too crumbly, add a tablespoon of alternative milk at a time (2-4 tbsp total), until the dough comes together. The finished dough should be thick, but scoopable.
Lastly, you can replace the chocolate for a vegan brand, like Pascha chocolate. OR, you can try out my easy icing recipe, which is found in my teddy bear cookie recipe.
Yes, you can! I recommend lining a tray or plate with parchment/wax paper. Then, arrange the cookie dough balls and bunny ears in a single layer and freeze for about 1 hour.
Once the cookie dough pieces are frozen, you can transfer them to an airtight container and freeze for up to 3 months. Bake as usual, but add 1-2 extra minutes.
Storage
If you’d like to store the sugar cookie dough, line a tray or plate with parchment or wax paper. Arrange the raw cookie balls and bunny ears in a single layer, then freeze for about 1 hour.
Once the cookie dough balls are frozen, transfer them to an airtight container and freeze for up to 3 months. Bake as usual, but add 1-2 extra minutes.
If you’d like to store freshly baked sugar cookies, wait until they are fully cool. Then, transfer the cookies to an airtight container at room temperature for up to 7 days.
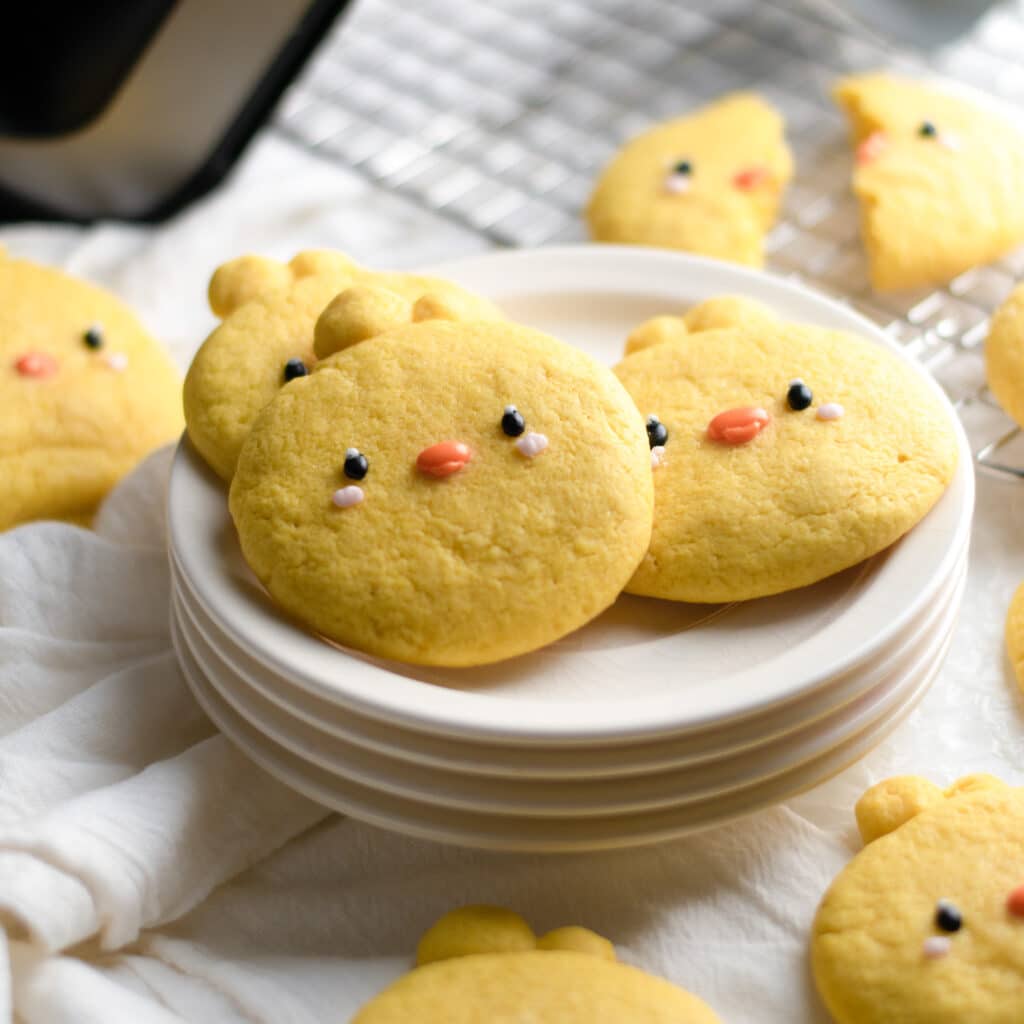
Other cute cookie recipes


I really hope you enjoy this recipe. If you make these bunny sugar cookies, I’d love to see them. You can tag me at #bitesbybianca / @bitesbybianca on Instagram. Enjoy! 🙂
📖 Recipe
Easy Bunny Sugar Cookies
✉️ want to save this?
Equipment
- 2 small bowls or plates for rolling dough in sugar or sprinkles
- 1 medium mixing bowl for dry ingredients
- 1 large mixing bowl for mixing dough
- 1 small cookie scoop holds 1 ½ tablespoons dough
- Parchment Paper
- 2 small microwave-safe bowls, for melting chocolate
- 2 small silicone spatulas,
- 2 Piping bags can alternatively use toothpicks or Ziploc bags
- 1 pair of scissors,
Ingredients
Dry ingredients:
- 1 ½ cups (187.5 g) all-purpose flour
- ½ teaspoon (2 g) baking soda
- ½ teaspoon (2 g) baking powder
- ½ teaspoon (3 g) salt
Wet ingredients:
- ½ cup (113.5 g) unsalted butter melted and cooled
- ¼ cup (50 g) granulated sugar
- ¼ cup (55 g) light or dark brown sugar packed
- 1 teaspoon (4 g) vanilla extract
- 1 (1) egg
For rolling:
- 4 tablespoons (48 g) granulated sugar
- sprinkles carrot sprinkles, pastel sprinkles
Decoration for face:
- 1 tablespoon (15 g) milk or dark chocolate
- 3 tablespoons (44.36 g) white chocolate
- pink/red oil-based food coloring see steps
Instructions
For the cookie dough:
- In a medium bowl, whisk together all of the dry ingredients: 1 ½ cups all-purpose flour, ½ teaspoon baking powder, ½ teaspoon baking soda, and ½ teaspoon salt.
- In a large bowl, use silicone spatula to mix melted ½ cup unsalted butter, ¼ cup granulated sugar, and ¼ cup light or dark brown sugar until combined.
- Add 1 egg and 1 teaspoon vanilla extract. Mix until smooth.
- Dump in all of the dry ingredients and mix until no dry spots remain.Tip: If you want soft cookies, continue onto the next steps. If you want slightly chewier ones, I recommend covering the dough with plastic wrap and refrigerating for 30 minutes, then follow the recipe as usual.
Scoop & bake cookies:
- Preheat oven to 325°F/163°C and line two baking trays with parchment paper or silicone mats.
- In a small bowl or plate, add 4 tablespoons granulated sugar for rolling the dough. Do the same with sprinkles.
- For regular sugar cookies, use small cookie dough scoop to gather dough (about 1 ½ tablespoon each). Roll into granulated sugar and place on lined baking tray, spacing cookies about 3-4 inches apart.
- For sprinkle sugar cookies, use small cookie dough scoop to gather dough (about 1 ½ tablespoon each). Roll tops into sprinkles and place on lined baking tray, spacing cookies about 3-4 inches apart.

- For bunny sugar cookies, use small cookie dough scoop to gather dough (about 1 ½ tablespoon each). Shape into a ball and roll in granulated sugar. Place onto lined baking tray. This will be the bunny's head.For the ears, take about ¾ tsp of dough, shape into ball, and equally split it into two. Roll the balls into about 1.25-inch logs, and place on the top sides of the heads. Make sure they are somewhat thin and spaced out, so they don't connect when baking.Place bunnies about 3-4 inches apart.
- Bake for 9-11 minutes. For soft cookies, bake them until the edges are set and firm. For chewier ones, bake slightly longer, until the edges are a light golden brown.Note: If using decorative carrot sprinkles like I did, immediately and gently push into the tops of freshly baked, warm cookies. This will help the sprinkles stay after cooling. Alternatively, use melted chocolate as glue to stick them on later. 🙂
- Let cool on pan for about 5-10 minutes, then transfer cookies to wire rack. Let cool completely.


For the bunny faces:
- Note: You can a piping bag, toothpick, or cookie scribe to add on the details. I used piping bags.
- Melt 1 tablespoon milk or dark chocolate in a small microwave-safe bowl. Microwave in 30-second intervals, stirring in between with a silicone spatula, until fully melted. Transfer to piping bag and use this to draw on the eyes and nose.
- Melt 3 tablespoons white chocolate to another small microwave-safe bowl. Add a small drop of pink/red oil-based food coloring. Transfer to piping bag and use this for the blush and ears.*If you don't have oil-based food coloring, then the chocolate will seize/become lumpy. To counter this, stir in a tsp of neutral oil (canola, vegetable) at a time, until it becomes smooth again.
- Enjoy!
Notes
- Store cookies in an airtight container at room temperature for up to one week.
- See blog post on how to make it vegan.

This recipe is really easy to make!! Yet it is still so delicious! The balance in sweetness is perfect (for me) and these are super quick to make. I will 100% use this recipe any time I need a quick treat 😋
Hi Mia! Yay! I’m so glad to hear. Thank you for trying the recipe! (:
So stinkin’ cute and delicious! Easy to make with little ones for Easter or spring time dessert. Literally melt in your mouth. Would 100% make again!
Aww yay, thank you so much for trying my recipe. I’m so so so glad you enjoyed! 🙂
The easiest recipe for sugar cookies with the most amazing and delicious outcome!! I’m definitely keeping this recipe as a go-to for sugar cookies because of how easy it was. They turned out so chewy and delicious! And decorating the cookies was so fun too <3 My husband and I love them! Thanks for the best recipe Bianca!!! 😀
Aww, Sara!! Thank you sooo so much for the nice review. I’m so glad you had a fun time making (and eating) the cookies, 🙂 Happy baking!!!
These were simple and so, so delicious! Take that chill time seriously, it makes a difference! I did two batches – a test batch that chilled 15 minutes and a second batch that chilled closer to 30 minutes. The 30 minute chill batch was chewy and melted in the mouth and the 15 minute chill batch was cakier and a touch dry. It’s absolutely worth the time and you can do all your clean up while it chills! 🙂
So cute and easy to make! Still need a little more practice with the ears lol I had a few cookies that looked like cats.(but hey it was my first time!) The sugar cookies are not too sweet so they went great with a cup of tea!
Super easy and delicious cookies❤️ Thank you for this perfect recipe.
i really love it!! not too sweet so it’s really good for my sweet tooth <333
very simple, tasty, & adorable! the recipe is easy to follow; i doubled it and ended up with 24 cookies
The recipe worked so well, the cookies turned super great! I added chocolate chips to half of the dough which was a nice touch 🐰💖
Thanks so much for sharing these recipes for free with us Bianca!!! <33
Amazing recipe!! The recipe worked so well, the cookies turned super great! I added chocolate chips to half of the dough which was a nice touch 🐰💖
Thanks so much for sharing these recipes for free with us Bianca!!! <33
I’m a beginner baker and this recipe was the only thing that worked for me. Not only are the cookies so cute and easy to make, they taste absolutely delicious. I recommend these cookies!! whether it’s your first time baking or you’re a pro 🙂 these are simple and amazing!! thank you so much for the recipe
super super yummy and easy to make!!!! thanks for shouting my friend and i’s angry bunny cookies out hehe 🙂
i made these and they were so cute and delicious!! also very simple and easy to follow recipe 🙂 !!