

✉️ want to save this?
Hi friends! This is the fifth animal in my animal cookie series so far, and these ones are pretty adorable. Check out my other animal cookie recipes here: Soft, Less Sweet Ube Sugar Cookie Bears (Dairy-Free!), Pig-Shaped Snickerdoodles (Vegan), Frog-Shaped Matcha Sugar Cookies (Vegan).
I’ve been meaning to use the black cocoa in my cabinet for a while, and thought it would be perfect for these black cocoa cat-shaped cookies. The recipe is pretty much based off my frog-shaped matcha sugar cookies, except the matcha is swapped out for black and regular cocoa powder. These cookies have crisp edges, a slight chew, the bitterness of the cocoa is balanced out by the sugar, but are not overly sweet. I made them vegan, but feel free to swap in regular butter, milk, and royal icing if you don’t have any dietary restrictions.
FAQ
Does it matter which vegan butter brand you use?
YES. When I was developing vegan cookie recipes, I had SOOOO many cookies come out like CREPES, even though I kept adding flour to the dough. This is because some vegan butter brands have high water to fat content, so they baked into very flat cookies.
I recommend high quality vegan butter brand like Miyokos and Country Crock.
Can you make these non-vegan?
ABSOLUTELY. Swap in regular butter and milk—you’ll get the same results.
Can you make these gluten-free?
YES! I recommend using 1:1 gluten-free flour.
Tips for baking and decorating
Properly measure the flour
I always like to measure my ingredients with a kitchen scale for consistent, accurate results. But if you’re measuring with cups, make sure you follow this tip: gently spoon in the flour into the cup until it’s full, then scrape the excess off using the back of a knife or offset spatula.
If you scoop the cup directly into the flour bag or container, the flour may get compacted, and you will be adding in more flour than necessary. On the other hand, if your flour is clumpy, you could be adding in chunks of flour into the cup with gaps in between them, possibly adding less flour than required. These instances can cause tougher or even really flat cookies, since the proper ratio of dry:wet ingredients isn’t met.
So, for best results, use a scale. If you don’t have one, gently spoon and level the flour into your
Shaping the dough into black cats
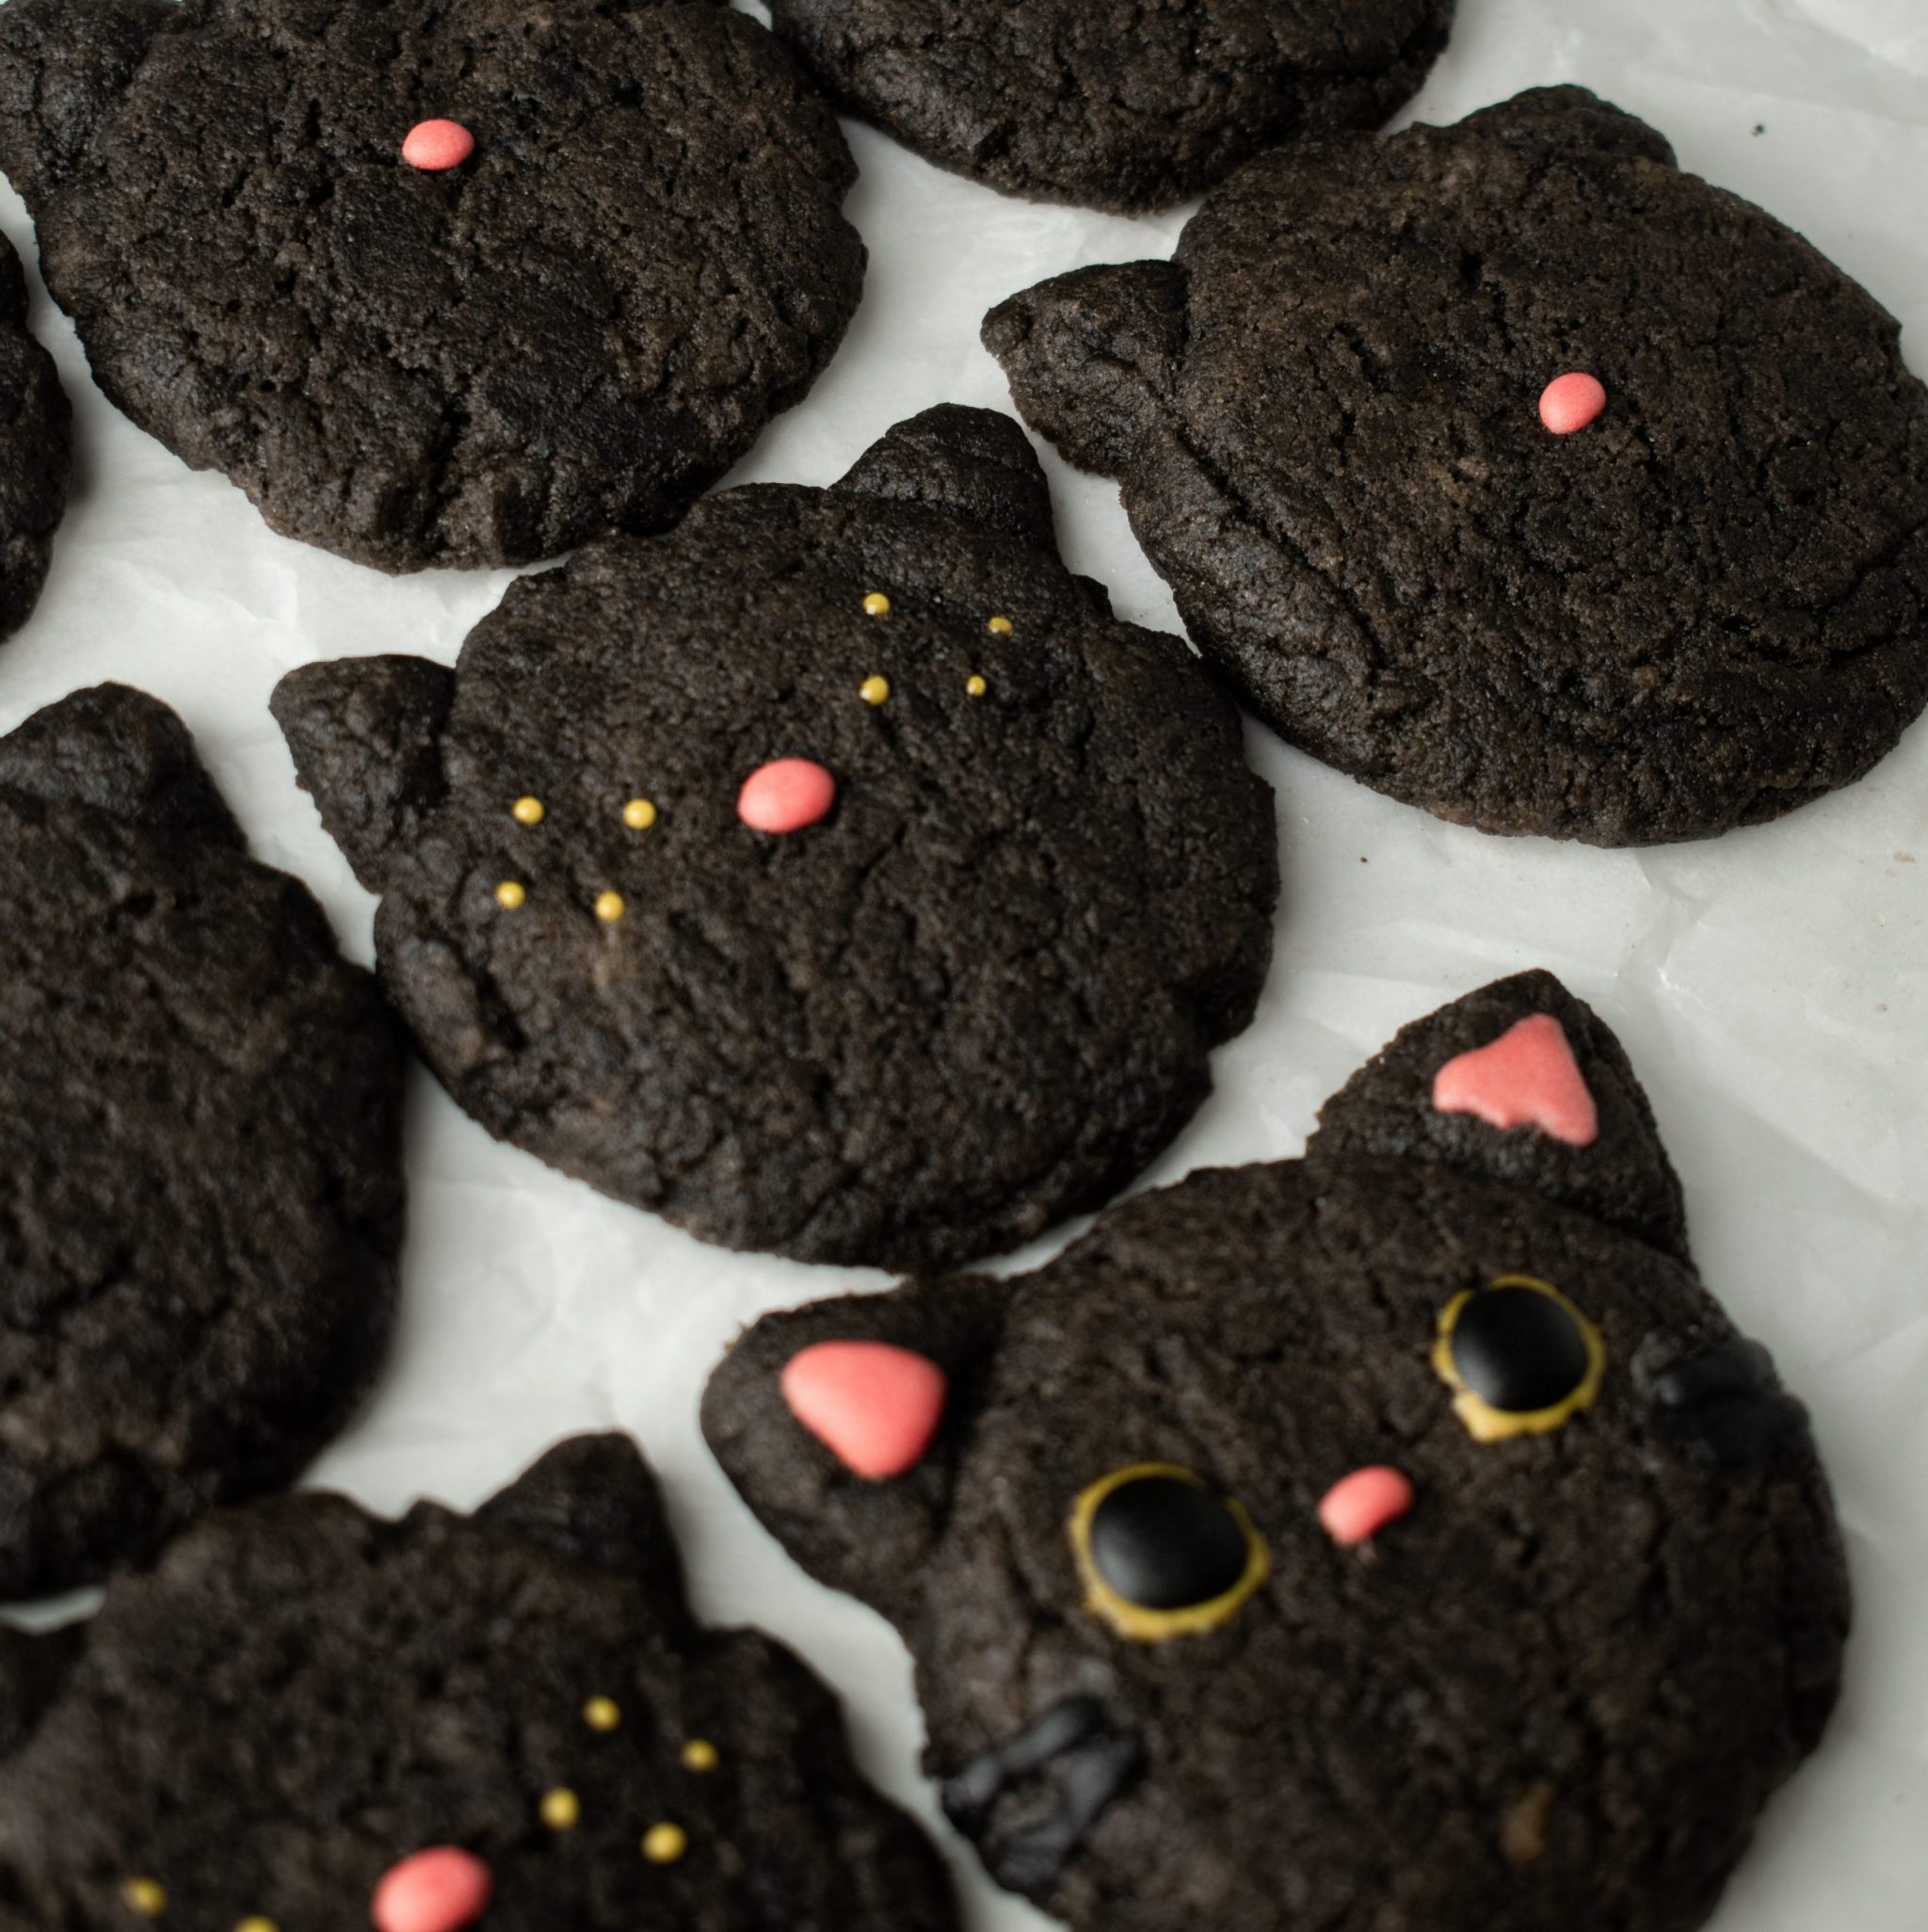
To make the head, roll 1 & 1/2 tablespoon of dough into a ball and place it onto a lined baking tray. Slightly press down on the ball with the palm of your hand or bottom of a cup to flatten them. For each of the ears, roll 1/4 teaspoon of dough into a ball and cut two sides of the ball to form a pointed end. Place the dough on the upper left or right side of the head. As they bake, the ears will connect to the head and you will get these cute cat-shaped black cocoa cookies! Once they are cooled, you can decorate them with vegan royal icing.
Decorating the cat faces
If I’m being honest, the first few cat cookies I made were atrocious. I really wish I took photos of them so you could see how scary they looked. It was quite the learning process since I’m not a pro at decorating cookies with royal icing. So, I want you to learn from my mistakes! Before I list the order you should go in, make sure you have a toothpick or cookie scribe so that you can help move the icing in the direction you want as you decorate.
- Start with the eyes: Begin decorating by outlining the eyes using the yellow royal icing. To make it easier, you can map out dots like I did in the image above, so that you can connect the dots into the shape you want. After outlining and connecting the dots, do the same for the rest of the cats. Once that is done, the outline should have dried a little, so now you can flood the inner part of the circle with the remaining yellow icing.
- Work on the ears and nose: While the yellow eyes are drying, add pink icing to the inner ears and pipe tiny noses to each cat.
- Whiskers: Add 2-3 whiskers on the left side and right side of each cat.
- Finish with the pupils: By now, the yellow should be somewhat dry. You can then go in and pipe large black pupils on top of the yellow, as imaged above. This step is where I found myself using my cookie scribe the most, just so I could leave a thin yellow ring around the pupils.
I really hope you enjoy this recipe. If you make these black cat cookies, I’d love to see them. You can tag me at #bitesbybianca / @bitesbybianca on Instagram. Enjoy! 🙂

Black Cocoa Cat-Shaped Cookies (Vegan)
✉️ want to save this?
Ingredients
Dry ingredients:
- 1 ¼ cup all-purpose flour (150g, $0.39)
- 1 tbsp cocoa powder ($0.12)
- 2 tbsp black cocoa powder ($0.24)
- ½ tsp baking soda ($0.01)
- ¼ tsp salt ($0.01)
Wet ingredients:
- ½ cup dairy-free unsalted butter, melted and cooled (1 stick butter/8 tbsp, $1.25)
- ¼ cup granulated sugar (50g, $0.10)
- ¼ cup light or dark brown sugar, packed (50g, $0.27)
- 1 tsp vanilla extract ($0.42)
- 2-4 tbsp dairy-free milk ($0.15)
Decoration for face:
- vegan royal icing, see recipe notes below. or use melted vegan milk/dark and white chocolate (dye the latter pink or red with oil-based food coloring)
Instructions
- In a medium bowl, whisk together all of the dry ingredients: all-purpose flour, cocoa powders, baking soda, and salt.
- In a stand mixer using the paddle attachment (can alternatively use hand mixer or whisk), mix the butter and sugars on medium speed until combined. Scrape bottom of bowl. Add vanilla and mix again.
- Dump in all of the dry ingredients and mix until combined. If the dough is crumbly, slowly add 2-4 tbsp of dairy-free milk until it comes together. The finished dough should be thick.
- Preheat oven to 350°F/177°C and line two baking trays with parchment paper or silicone mats.
- Use small cookie dough scoop to gather dough (about 1 ½ tablespoon each). Shape dough into ball, then place onto lined baking tray. Flatten with palm of your hand or bottom of a cup. This will be the cat's head.For the ears, take ½ tsp of dough and shape into a triangle with your fingers Place the ear on the upper left or right side of the head and repeat for the other ear. Place cats about 3-4 inches apart. They will not spread much while baking.
- Bake for 10-13 minutes. Cookies should look slightly puffy and soft in the center with set edges. They will not brown because of their black color. Be careful to not over bake so they don't get crispy! They will continue cooking when cooling on the pan.
- Let cool on pan for about 5-10 minutes, then transfer to wire rack. Let cool completely.
- To add the faces, use pink, yellow, and black colored vegan royal icing (recipe in notes below). Place into small piping bags and cut a small tip for each one. Have a toothpick or cookie scribe on hand to help you move the icing in the direction you want as you decorate the cookies.First, start with the eyes using the yellow royal icing: outline the eyes by piping 4 dots that you can connect into a circle. After connecting the circle for each eye, move onto the next cat. This allows the yellow outlines to somewhat dry, allowing you to flood the middle with the remaining yellow icing. After piping the eye outlines for each cat, flood the circles with the yellow icing. While that dries, use the pink royal icing to add the noses and inner ears for each cat.Take black icing and pipe whiskers on the left and right sides of the cat's face. Finally, using the black icing, add the pupils to the cat's eyes within the yellow circle. Leave a small perimeter of the yellow around the pupils as pictured in my photos.
- Enjoy!
Notes
- I used this recipe for the vegan royal icing and I skipped the optional vegetable glycerin. It actually makes a lot of royal icing, so I already had a bunch of it stored in my freezer! It only takes about 10 minutes for it to thaw.
- Store cookies in an airtight container at room temperature for up to a week.

Loved how easy this recipe is and it’s perfect to make for Halloween! I had fun shaping the cat faces and decorating them 🖤 Very tasty chocolate cookies too, almost reminded me of Oreos but softer and deliciously chewy 🙂
Hi Sara!! YAY thank you for your comment, I love to hear it!!! <3
11/10! too cute to eat but they’re addicting & rather easy to make🐈⬛🐈⬛