
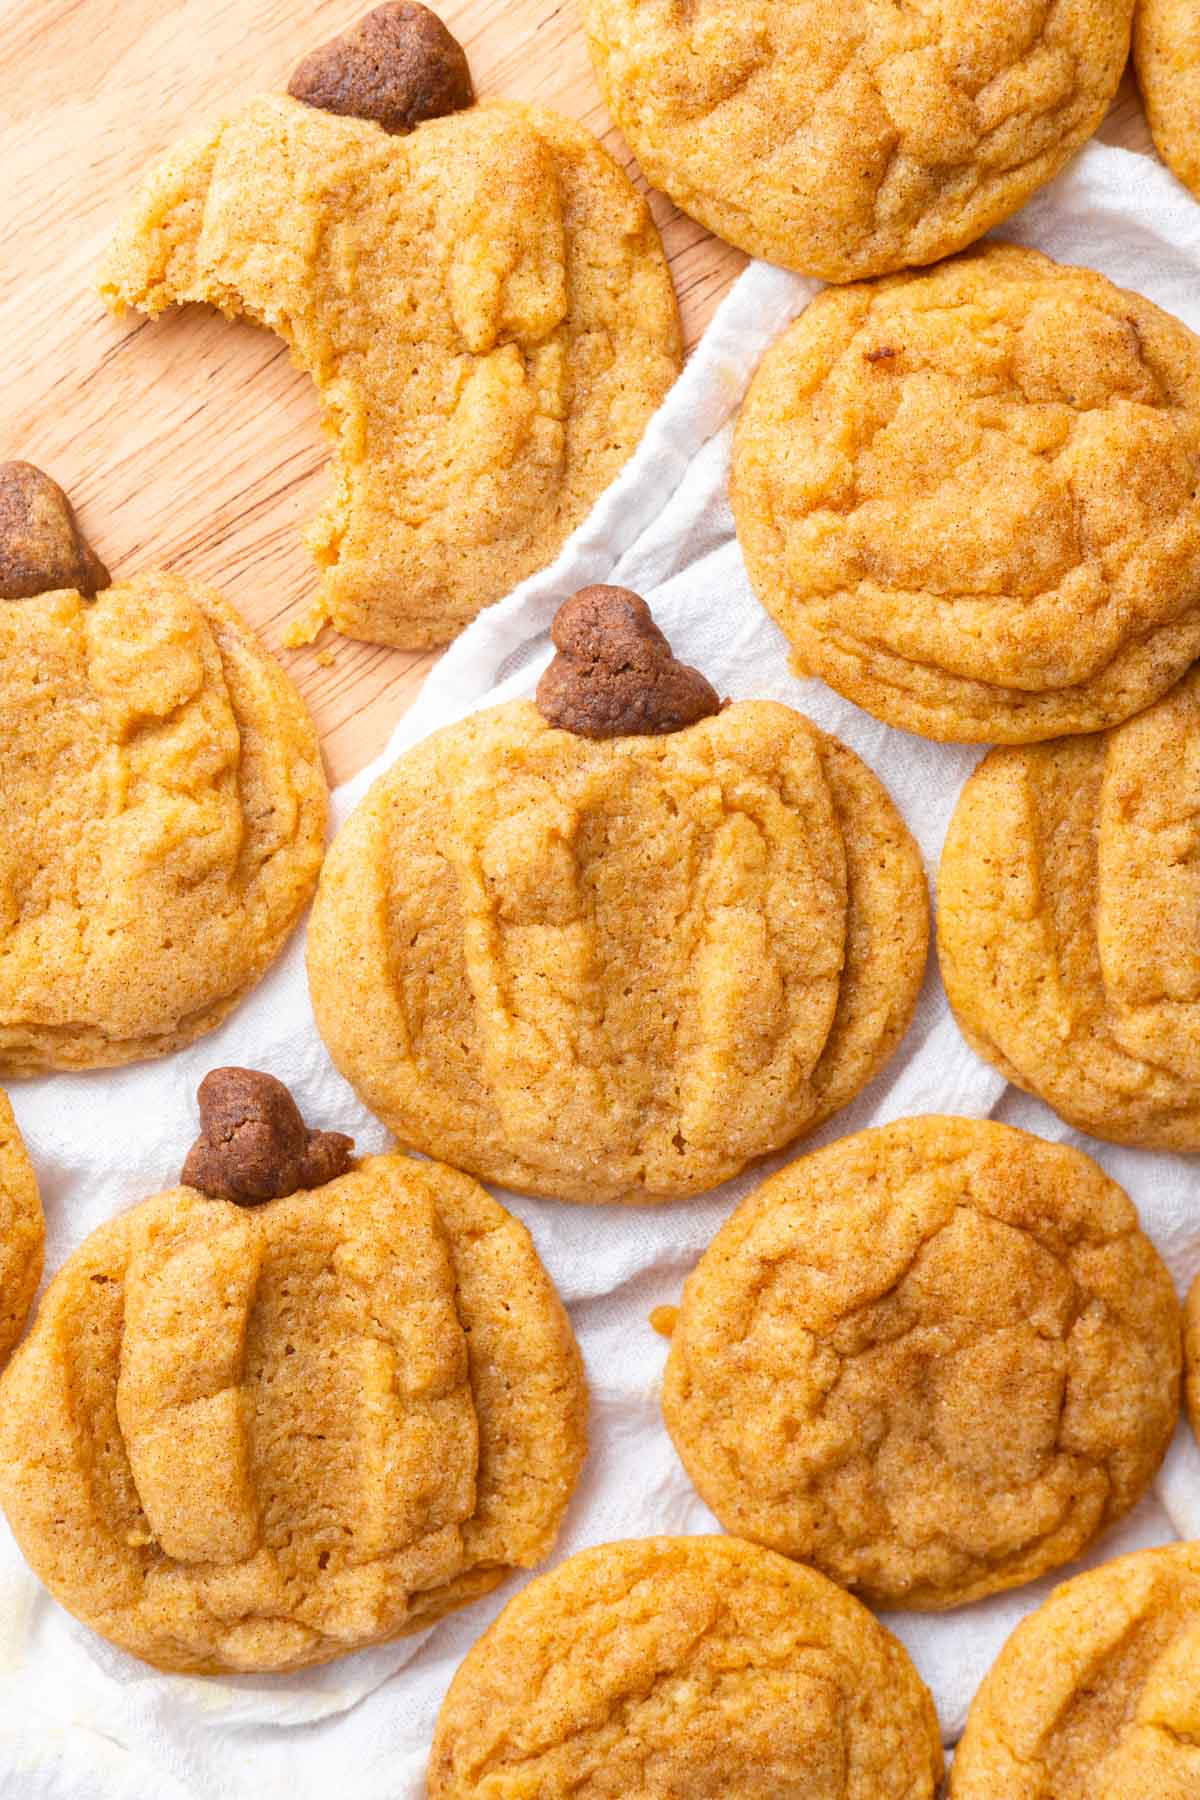
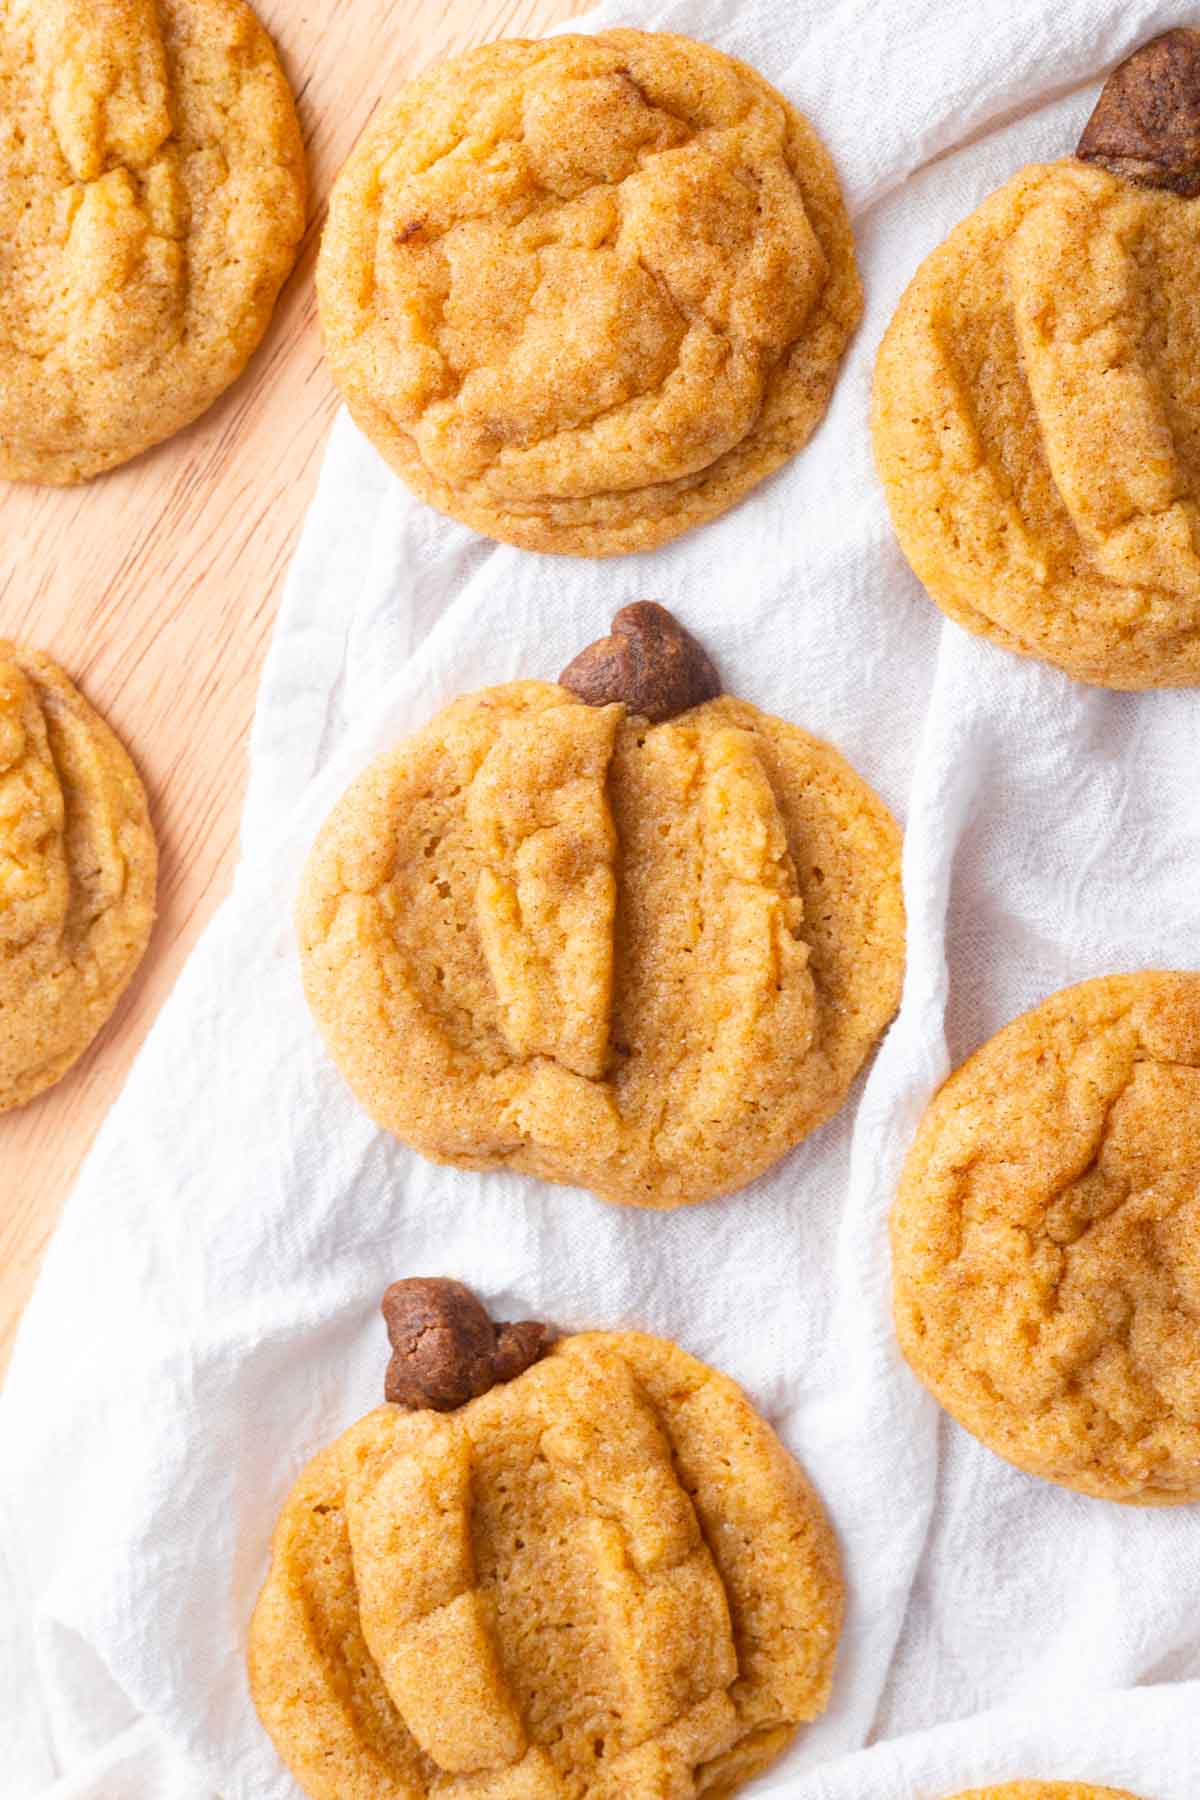
These easy pumpkin snickerdoodles are melt-in-your-mouth and so cute! The cookie dough comes together within 10 minutes and is flavored with pumpkin puree, pumpkin spice, and cinnamon sugar to really celebrate Fall.
Note: This blog post was updated October 2024 to include new photos & information to make this recipe more fool-proof! <3
✉️ want to save this?
🎃 Why You’ll Love This Recipe
- It’s adorable and yummy! These cookies are the perfect mix of fun and delicious, with just the right amount of Fall, tangy snickerdoodle flavor. Plus, they’re soft and melt-in-your-mouth.
- This is THE Fall cookie recipe. Imagine them as part of a dessert spread at a holiday party—so cute! And if you want to make them spooky, use melted chocolate or icing to draw on jack o’lantern faces.
- It’s egg-free. The pumpkin puree completely replaces the egg, so these cookies are great for anyone who avoid eggs in their diet!
- You won’t need any special equipment. Simply mix the ingredients with a silicone spatula, shape, and bake!
Ingredients
To make this easy pumpkin snickerdoodle recipe, you’ll need the following ingredients:
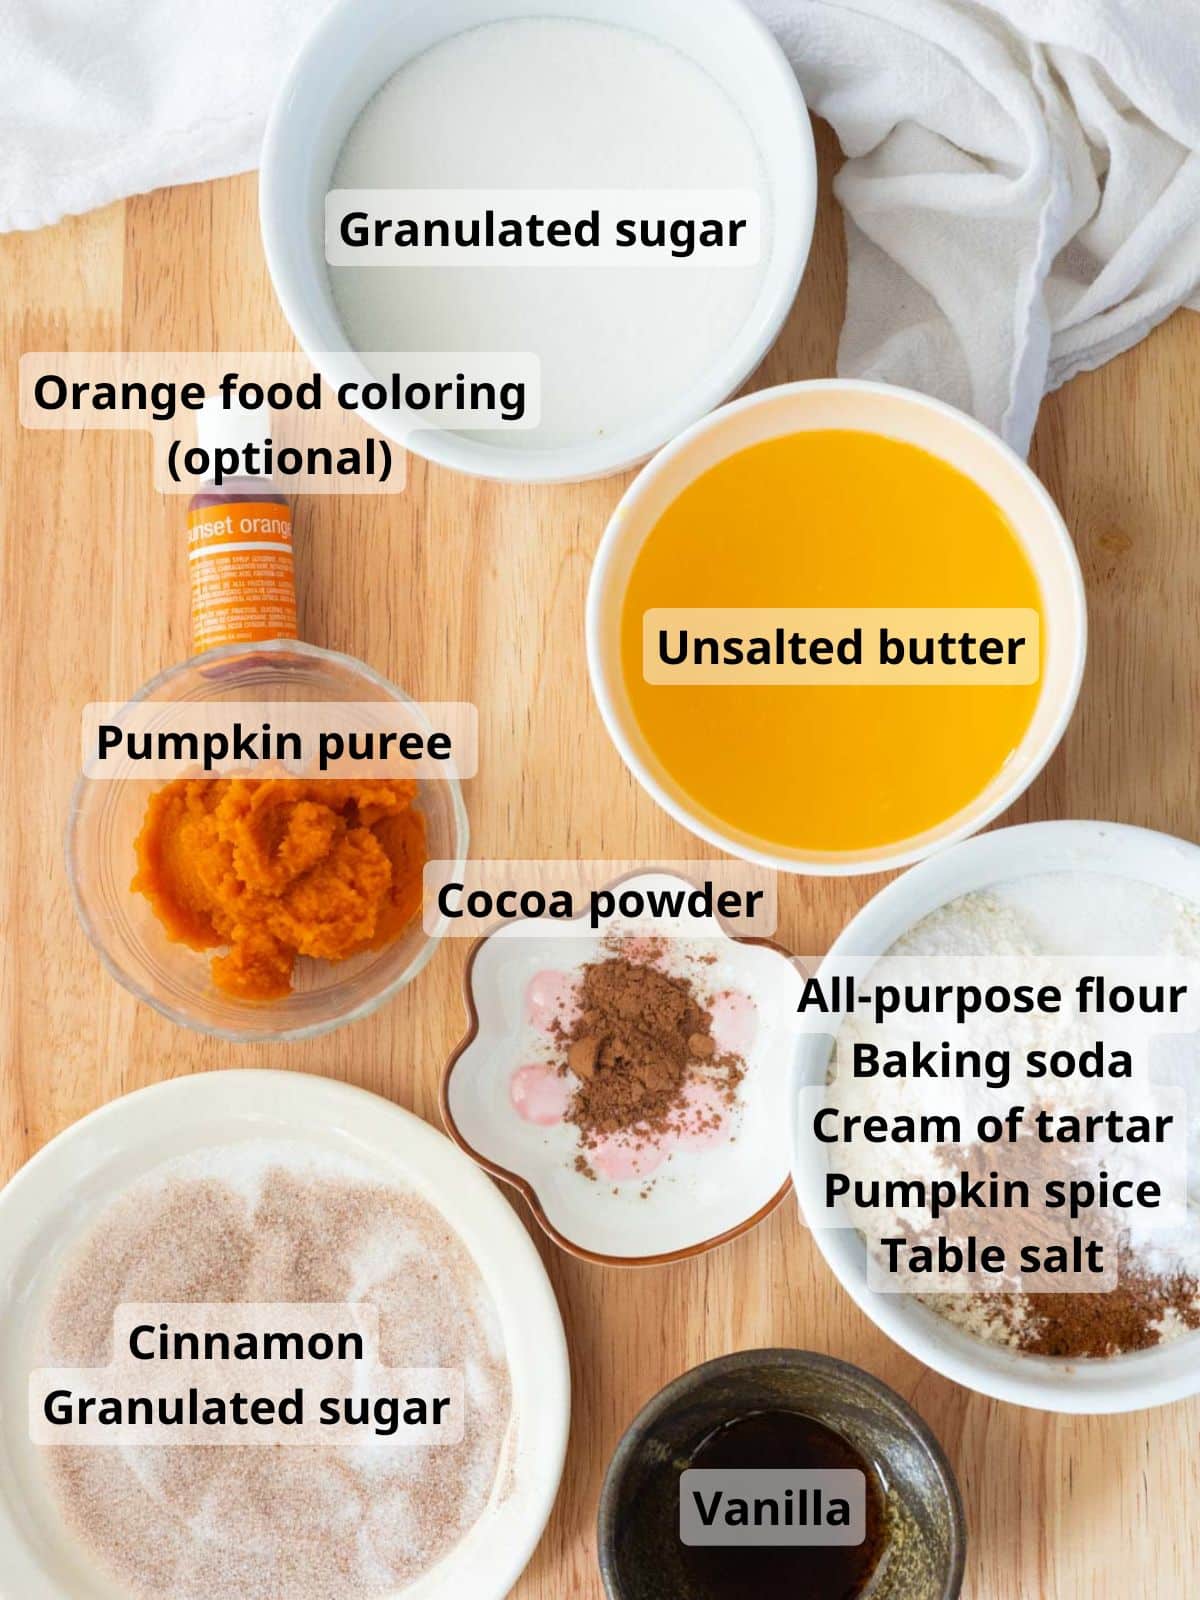
- Snickerdoodles call for cream of tartar, which lends to their unique tangy flavor!
- Pumpkin puree and pumpkin spice add the perfect amount of Fall flavor to these cookies! Be sure to use canned pumpkin puree and not canned pumpkin pie filling.
- You can use either vanilla extract or vanilla paste (1:1) in this recipe.
- The table salt can be swapped out with fine sea salt (1:1).
- The cookie dough balls are rolled in a mix of cinnamon sugar prior to baking for extra cozy flavor.
- If you want a deeper orange color, feel free to add a few drops of orange food coloring! I personally didn’t use any and ended up with a nice pastel shade of orange.
For the full list of ingredients and measurements, see the recipe card below.
💡 Baking Tips
- Weigh your ingredients! One of my favorite kitchen tools is a kitchen scale because it’s more accurate than measuring by volume. If you use cups, spoon the flour in gently, then level it with a knife or spatula.
- Bake a test cookie first. When trying a new design, expect some wonky cookies at first—maybe the dough is pressed too far down or the cookies spread more than you hoped. I always like test one cookie first, then adjust before baking the rest of the dough to get the results I want!
- Want to make them even cuter? Decorate them as jack o’lanterns with melted chocolate!
How To Make Pumpkin Snickerdoodles
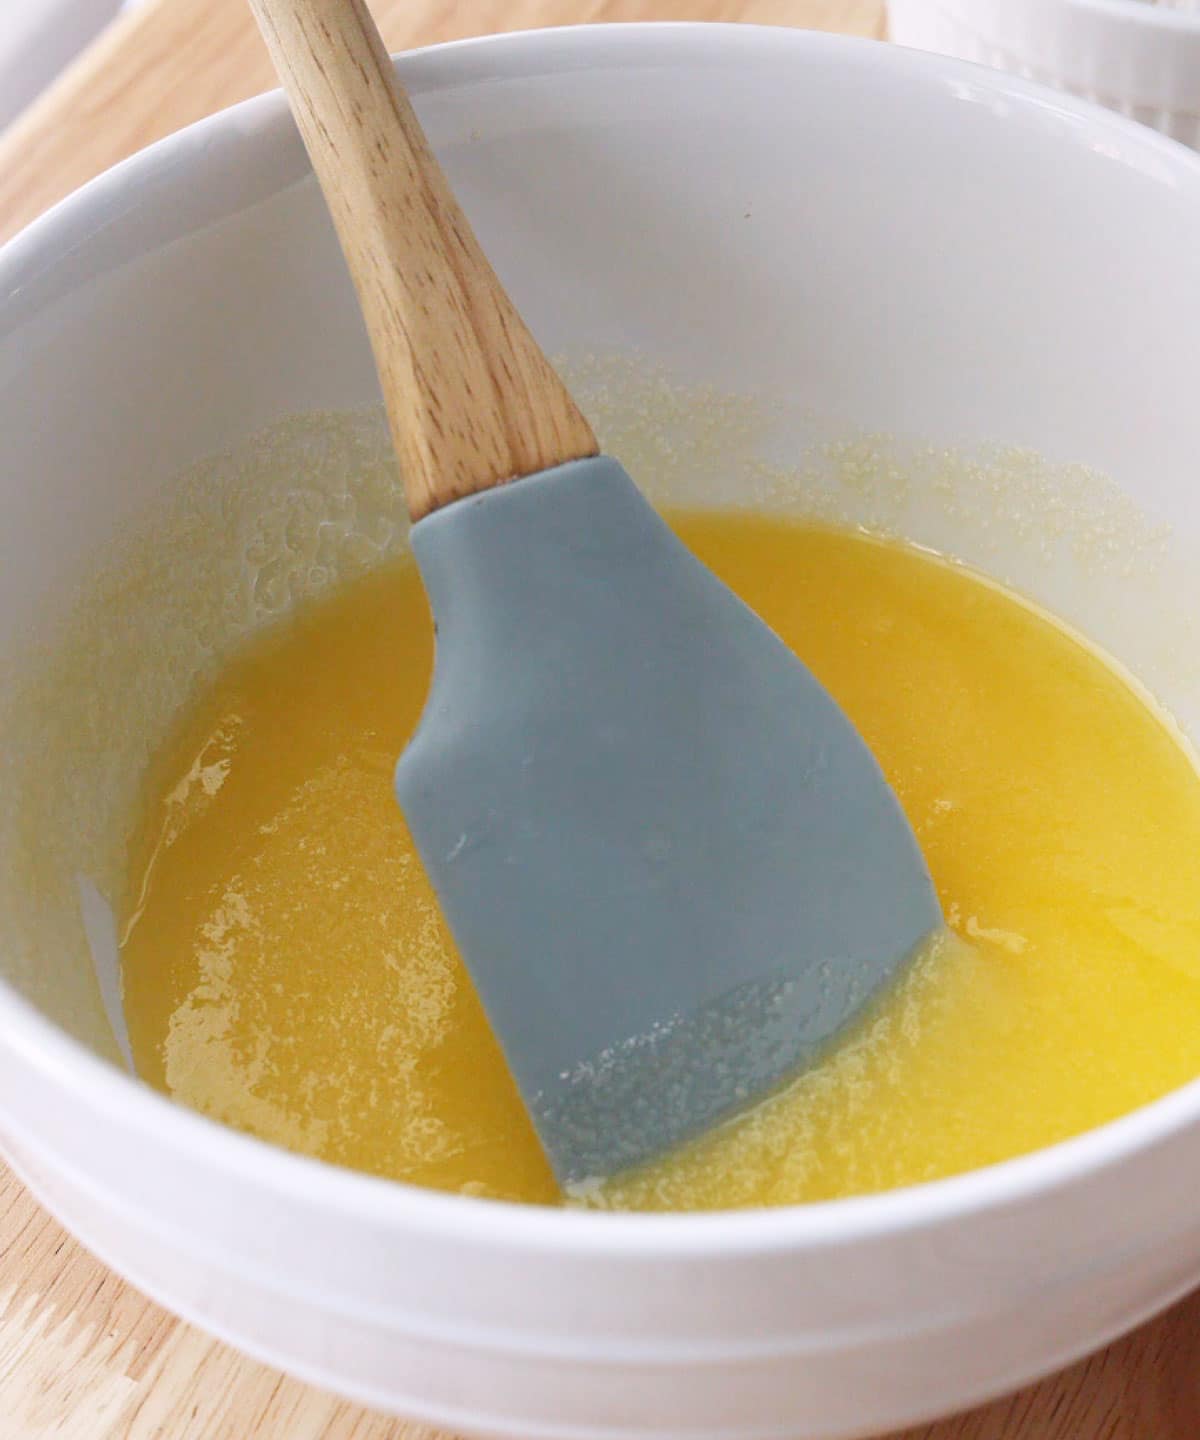
Step 1: Mix melted butter and granulated sugar until combined.
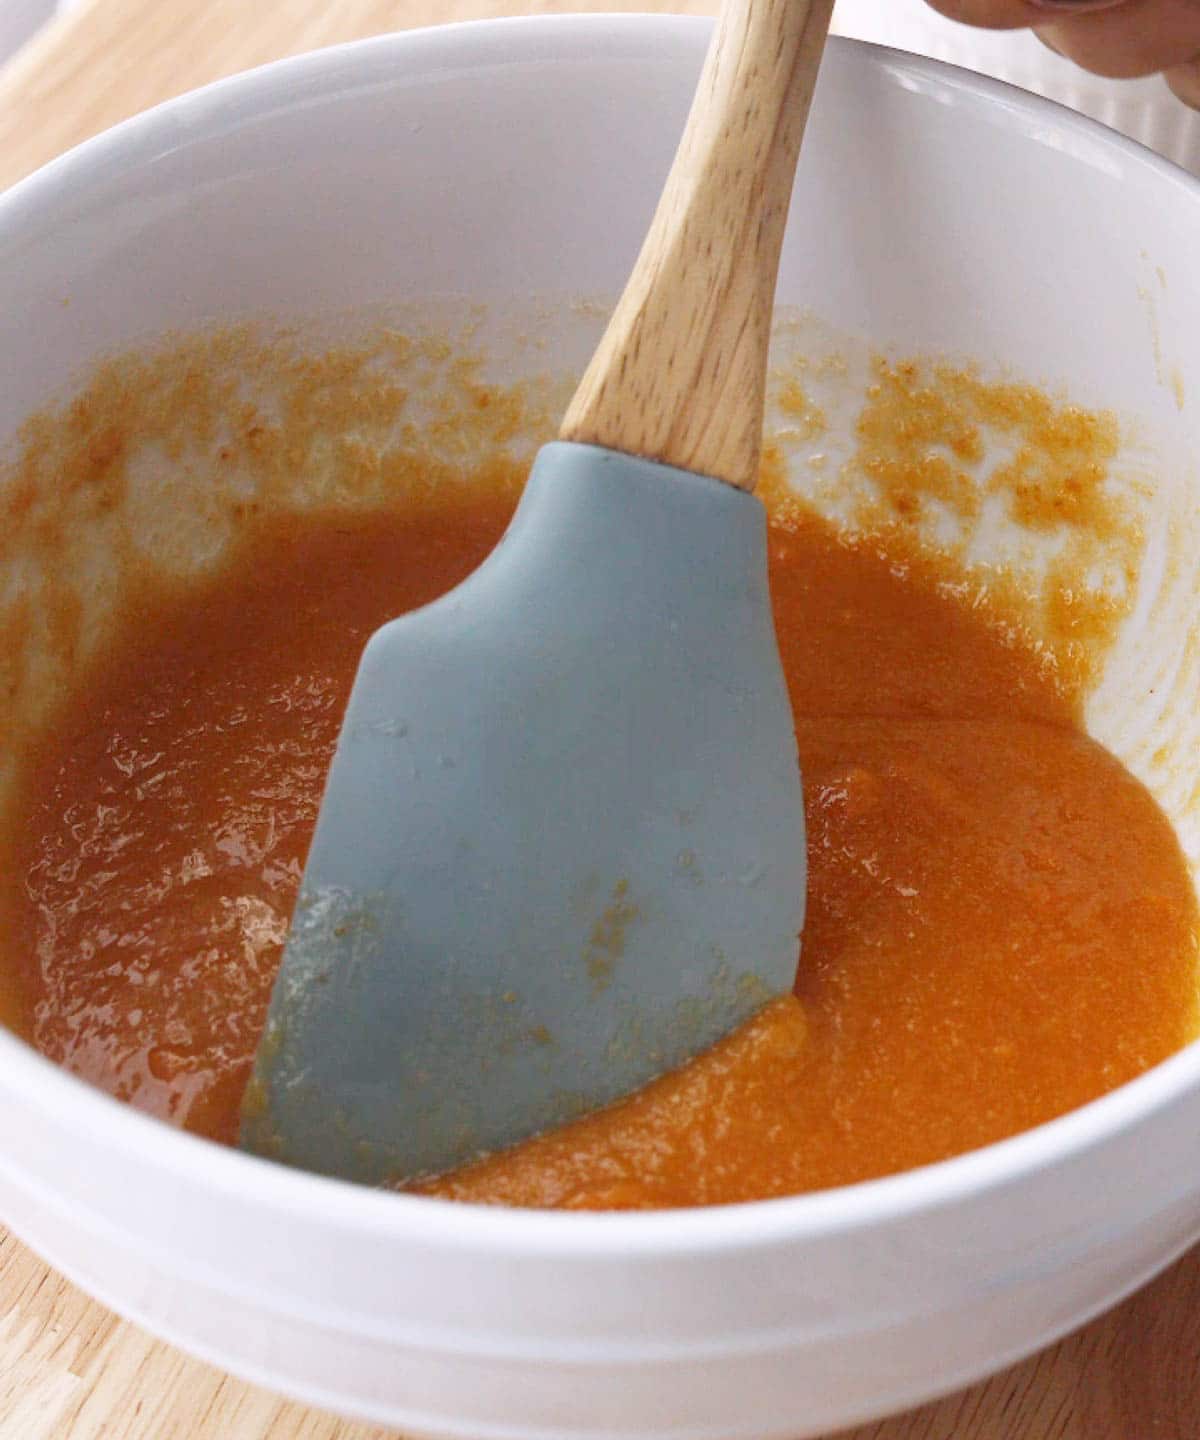
Step 2: Add pumpkin puree and vanilla, mixing until smooth.
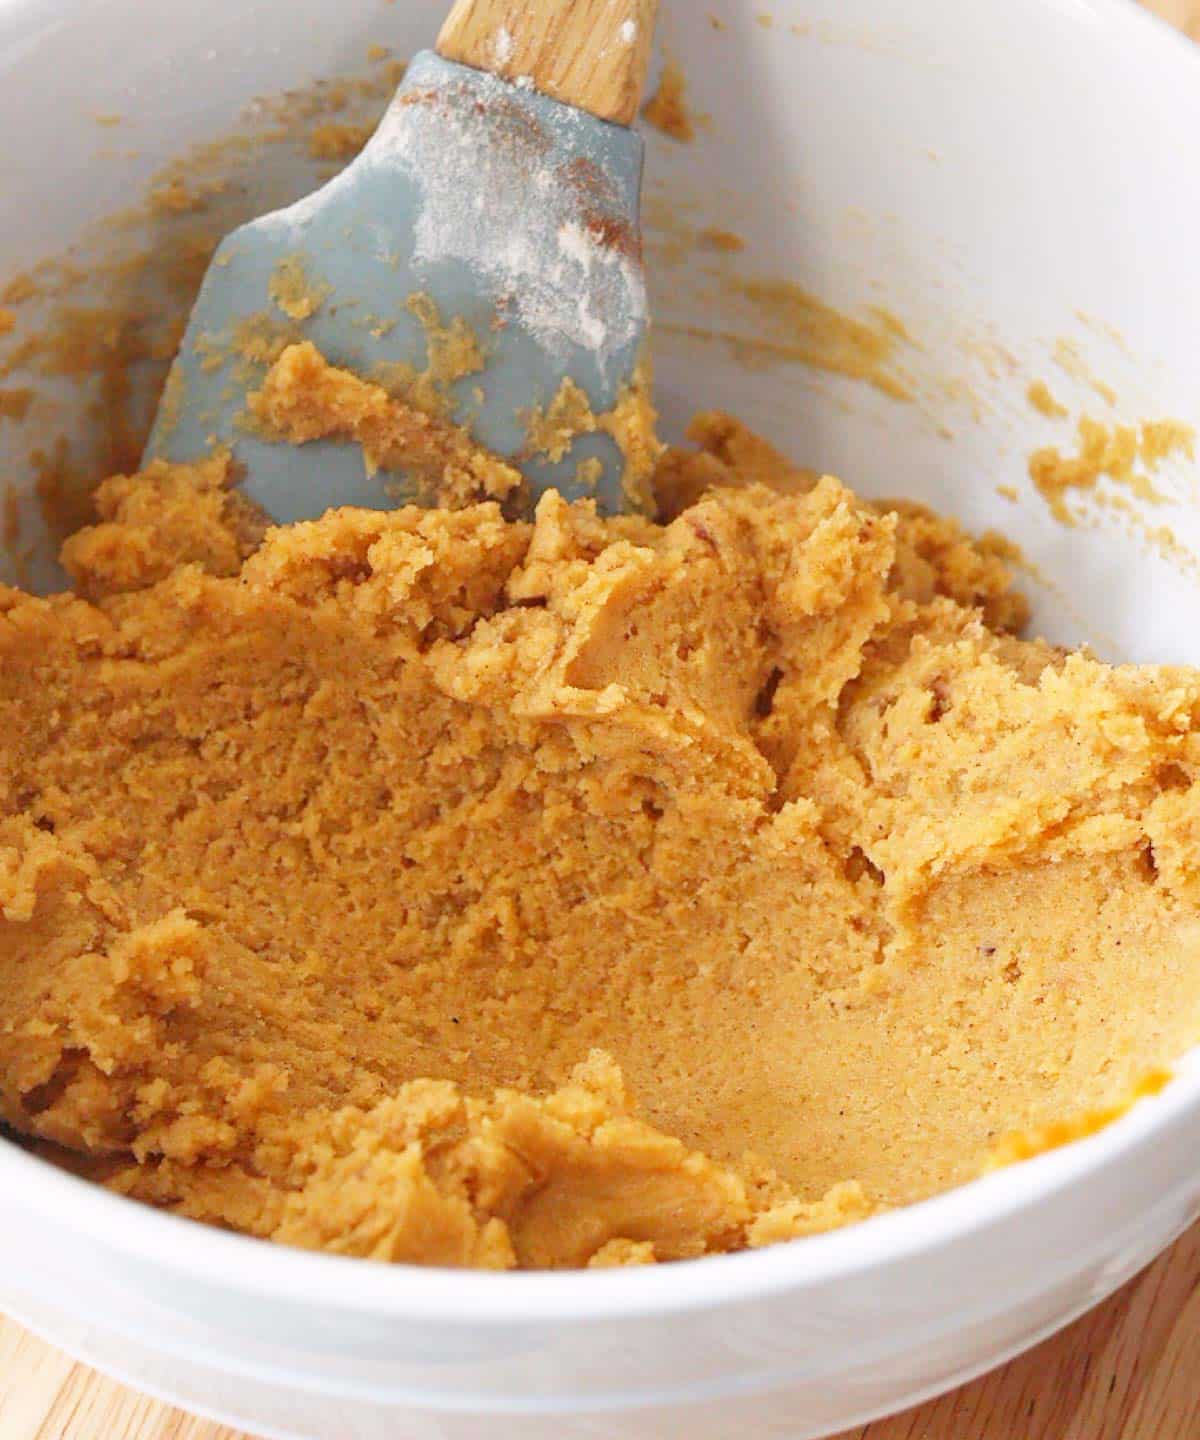
Step 3: Stir in dry ingredients (excluding cocoa powder) until no dry spots remain.
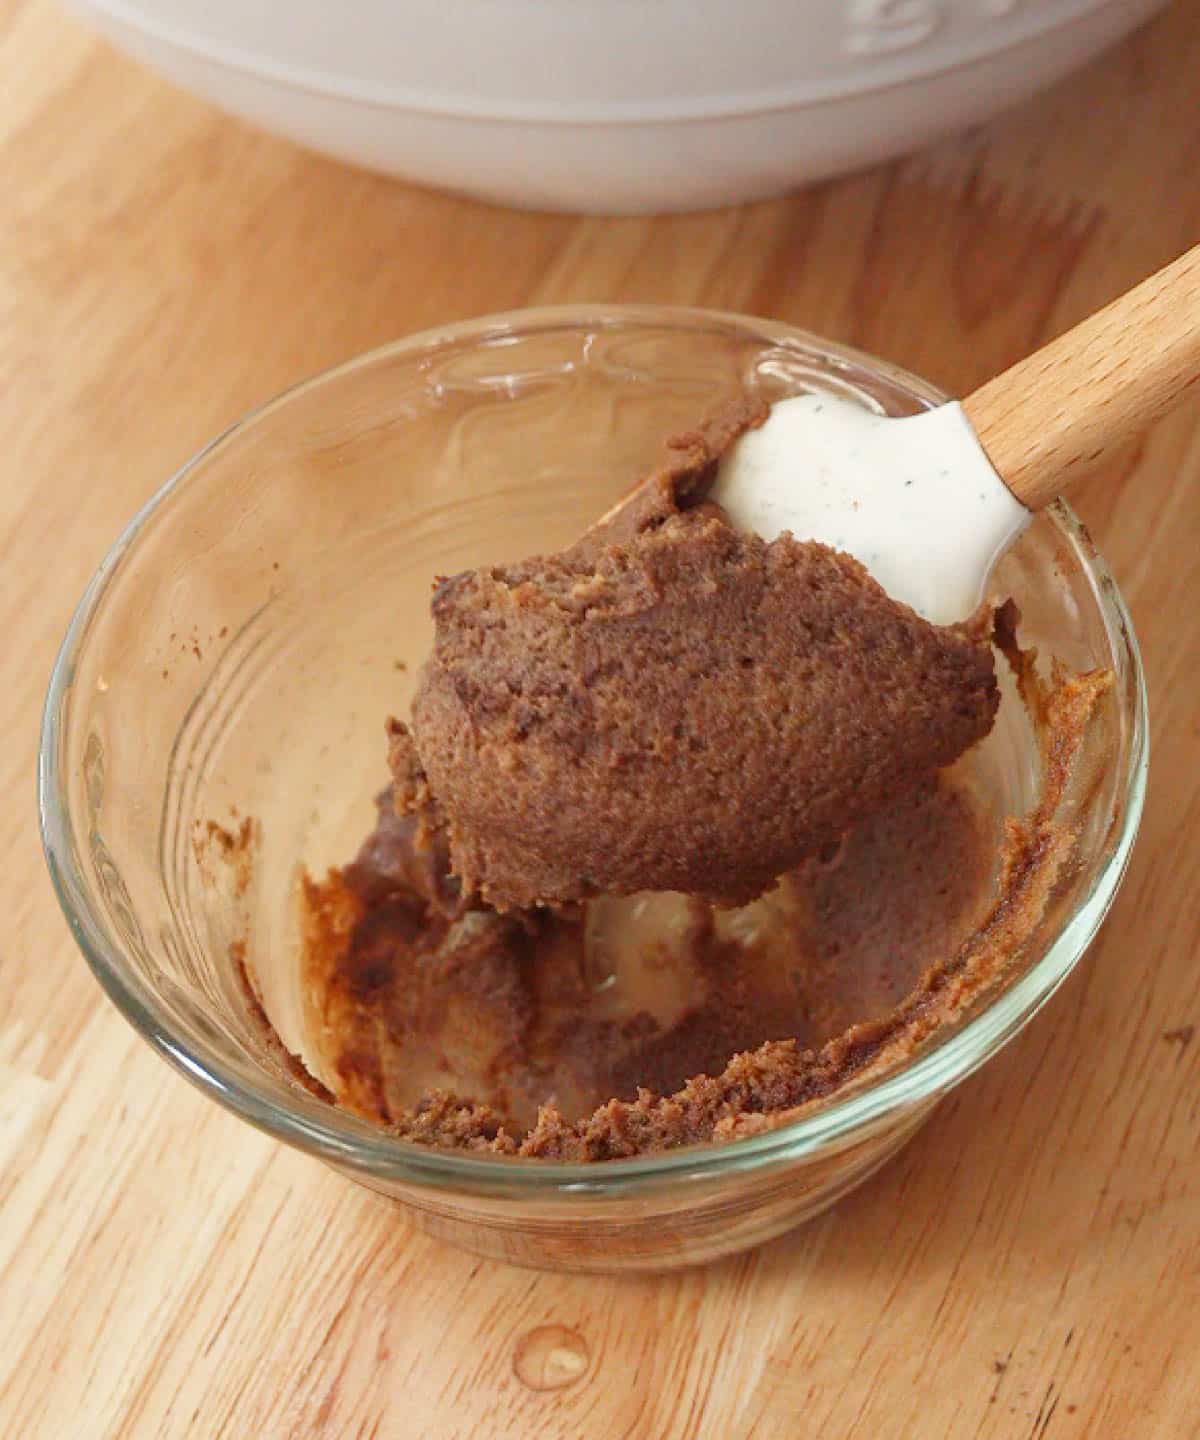
Step 4: Dye about 2 tablespoons of dough brown using cocoa powder. This will be for the pumpkin stems.
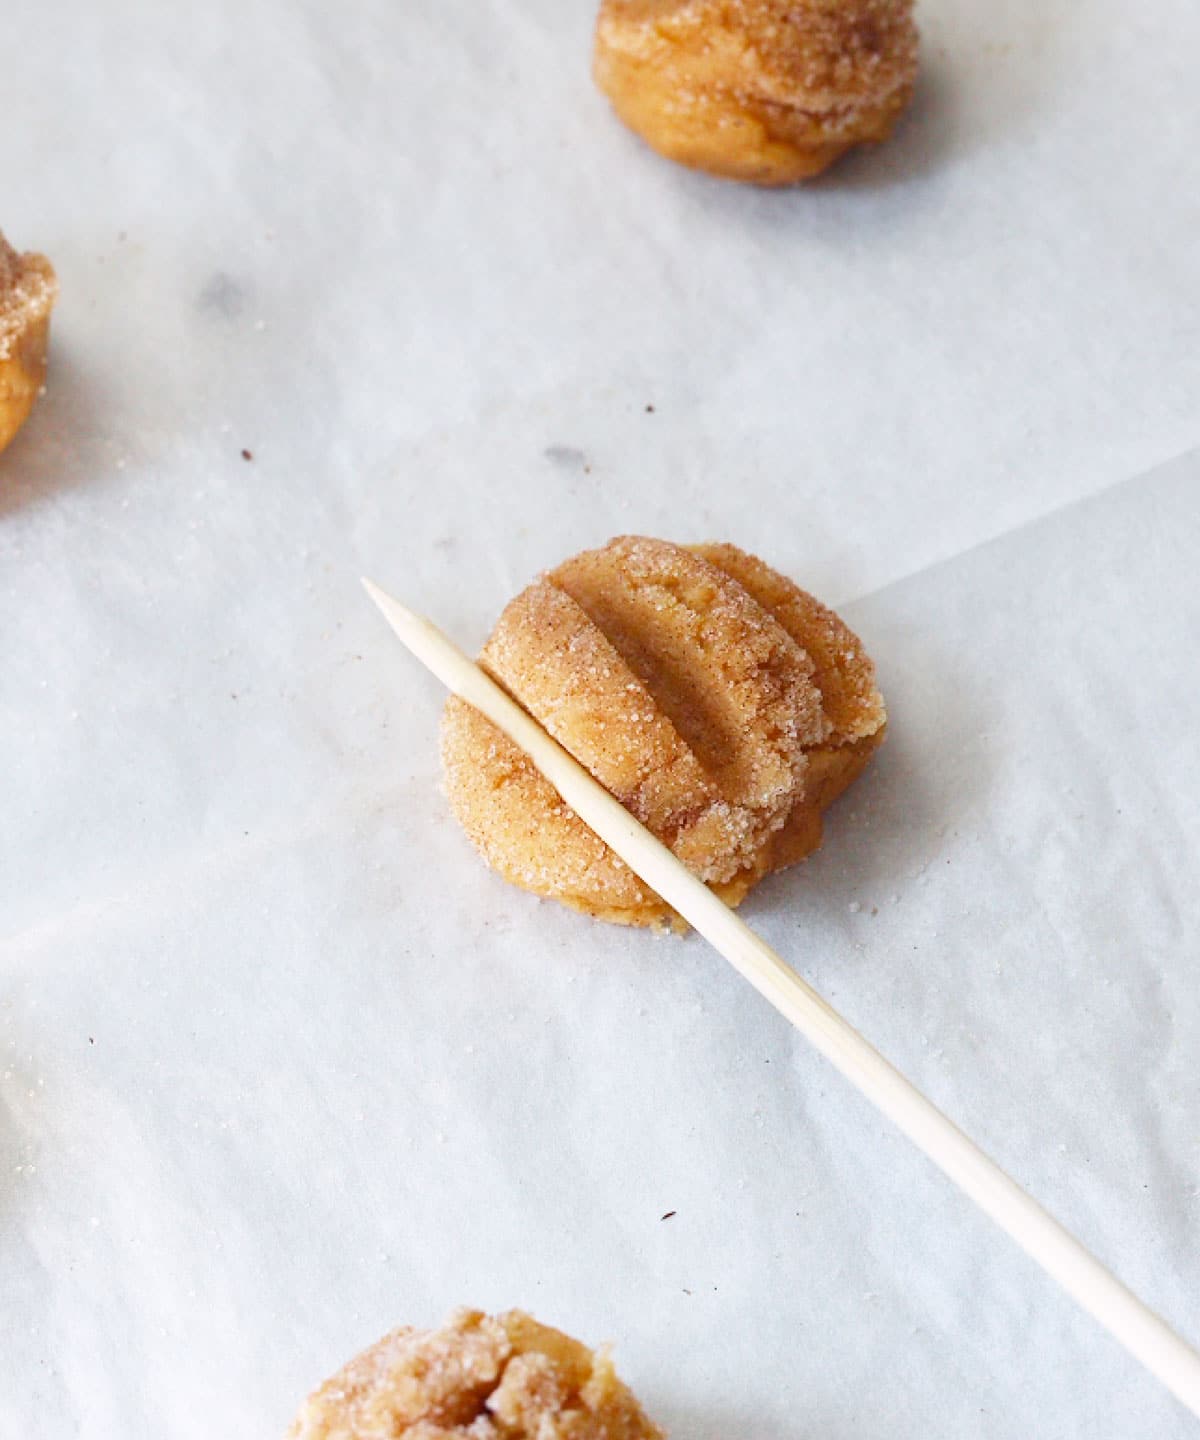
Step 5: Roll 1-2 tablespoon balls of dough into cinnamon sugar and place on lined baking tray. Using a skewer, toothpick, or back of a knife, create three indents into the dough. This will make the pumpkin lines.
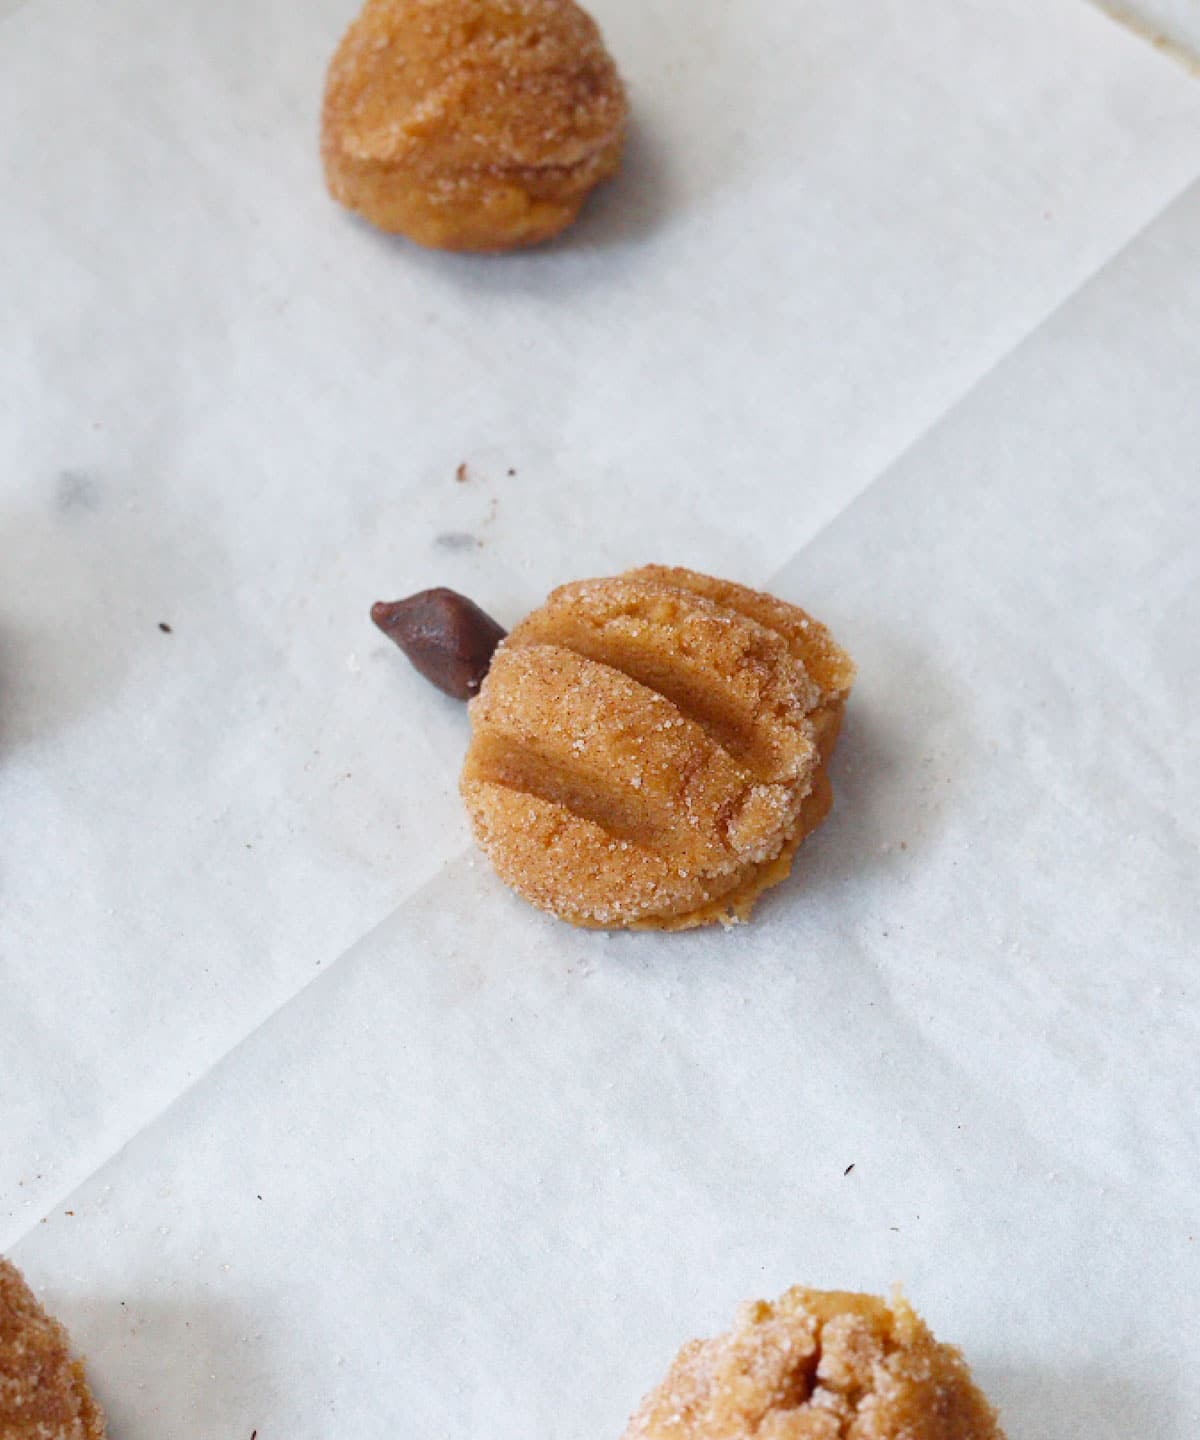
Step 6: Add pumpkin stem using about ½ teaspoon of brown dough. Bake at 350°F/177°C for 9-11 minutes, or until edges are set middles look mostly cooked. Remove from the oven let cookies sit on baking tray for at least 5 minutes, then transfer to wire rack to fully cool.
For full instructions, see the recipe card below.
“Omg just had a pumpkin cookie. That was ridiculous.” – cookie taste tester 🍪
Storage
- Room temperature: Store cooled cookies in an airtight container at room temperature for up to 5 days.
- Freezing instructions: Store cooled cookies in a freezer-safe container for up to 3 months. You can also freeze cookie dough balls. Bake as usual, just add 2-3 minutes to the baking time!
- Reheating instructions: Allow frozen cookies to thaw at room temperature for about 15 minutes. Or, reheat in the microwave at 10-second intervals.
❤️ More Snickerdoodle Recipes

Did you try this recipe?
Please leave a review & share it with me on Instagram, Facebook, Tiktok, or Pinterest!
Thank you so much! -Bianca ❤️
📖 Recipe & Video
Pumpkin Snickerdoodles
✉️ want to save this?
Equipment
- 1 small plate for rolling dough in cinnamon sugar
- 1 small bowl for dying dough
- 1 large mixing bowl for mixing cookie dough
- 1 small cookie scoop 1-2 tablespoon capacity
- 1 skewer or toothpick or back of knife
Ingredients
Dry ingredients:
- 1 ⅓ cups (166.67 g) all-purpose flour
- 1 ½ teaspoons (3 g) pumpkin spice
- 1 teaspoon (3 g) cream of tartar
- ½ teaspoon (2 g) baking soda
- ¾ teaspoon (4.5 g) fine sea salt or table salt (1:1)
Wet ingredients:
- ½ cup (113.5 g) unsalted butter melted and cooled to room temperature
- ⅔ cup (100 g) granulated sugar
- ¼ cup (61.25 g) pumpkin puree
- 1 tablespoon (13 g) vanilla paste or extract
- ½ teaspoon (0.5 g) cocoa powder*** for pumpkin stems
For rolling:
- ¼ cup (50 g) granulated sugar
- ½ tablespoon (4 g) cinnamon
Instructions
Make the pumpkin cookie dough:
- In a large mixing bowl, use silicone spatula to stir together ½ cup unsalted butter and ⅔ cup granulated sugar until combined.
- Add ¼ cup pumpkin puree and 1 tablespoon vanilla. Mix until smooth. If you'd like a deeper orange color, add a few drops of orange food coloring. (I did not use any food coloring).
- Dump in all of the dry ingredients: 1 ⅓ cups all-purpose flour, 1 ½ teaspoons pumpkin spice, 1 teaspoon cream of tartar, ½ teaspoon baking soda, and ¾ teaspoon fine sea salt. Mix until no dry spots remain.
- Transfer about 2 tablespoon of dough into another bowl. Add ½ teaspoon cocoa powder***, mixing until the brown color is uniform. This will be for the pumpkin stems.
Shaping the pumpkins:
- Preheat oven to 350°F/177°C and line two baking trays with parchment paper.
- On a small plate, mix ¼ cup granulated sugar and ½ tablespoon cinnamon. Set aside.
- Use cookie dough scoop to gather dough (1-2 tablespoons). Roll into cinnamon sugar and place on lined baking tray, spacing cookies about 3-4 inches apart.
- Use skewer to gently press 3 lines into the dough ball to create pumpkin lines. Take about ½ tsp of brown dough and shape into a pointed cylinder. Place right above the pumpkin to create the stem.
- Bake for 9-11 minutes, or until edges are set and middles look mostly baked. Cool cookies on pan for 5 minutes, then transfer cookies to wire rack to cool completely. Enjoy!
Notes
- Weigh your ingredients! One of my favorite kitchen tools is a kitchen scale because it’s more accurate than measuring by volume. If you use cups, spoon the flour in gently, then level it with a knife or spatula.
- Bake a test cookie first. When trying a new design, expect some wonky cookies at first—maybe the dough is pressed too far down or the cookies spread more than you hoped. I always like test one cookie first, then adjust before baking the rest of the dough to get the results I want!
- Room temperature: Store cooled cookies in an airtight container at room temperature for up to 5 days.
- Freezing instructions: Store cooled cookies in a freezer-safe container for up to 3 months. You can also freeze cookie dough balls. Bake as usual, just add 2-3 minutes to the baking time!
- Reheating instructions: Allow frozen cookies to thaw at room temperature for about 10 minutes. Or, reheat in the microwave at 10-second intervals.

I brought a plate of 18 of these cookies to Friendsgiving, and they were a hit—completely gone by the end! They’re incredibly cute, soft, and I love how the pumpkin spice flavor shines through!
Hi Mo!!!
YAY, thank you so much for your review. So happy they were enjoyed at Friendsgiving! 🙂
<3 Bianca
(I am the author of this recipe)
I made these cookies for my partner’s grandma & cousins, who all loved them! The cookies were a nice, yummy, and easy homemade gift, especially with Halloween right around the corner.