These conversation heart cookies are the perfect homemade Valentine’s Day gift for your loved ones! They’re soft, buttery, easy to make, and completely customizable—so have fun writing your messages! 🙂

✉️ want to save this?
❤️ Why You’ll Love This Recipe
- They’re delicious. They’re buttery, not-too-sweet, yet really easy to make!
- It’s versatile. Not only can you cut out different shapes, you can add different toppings! Feel free to decorate them with royal icing or dip/drizzle them with melted chocolates. You can even add toppings like crushed nuts, candies, sprinkles, etc.
- The cookies hold their shape incredibly well! The dough barely spreads when baked in the oven, which is perfect for cutting out fun shapes. You can even use a cookie stampers on them, too!
Looking for more easy cookie recipes? Try out my cut-out matcha cookies!
Ingredients
For the cut-out cookies:
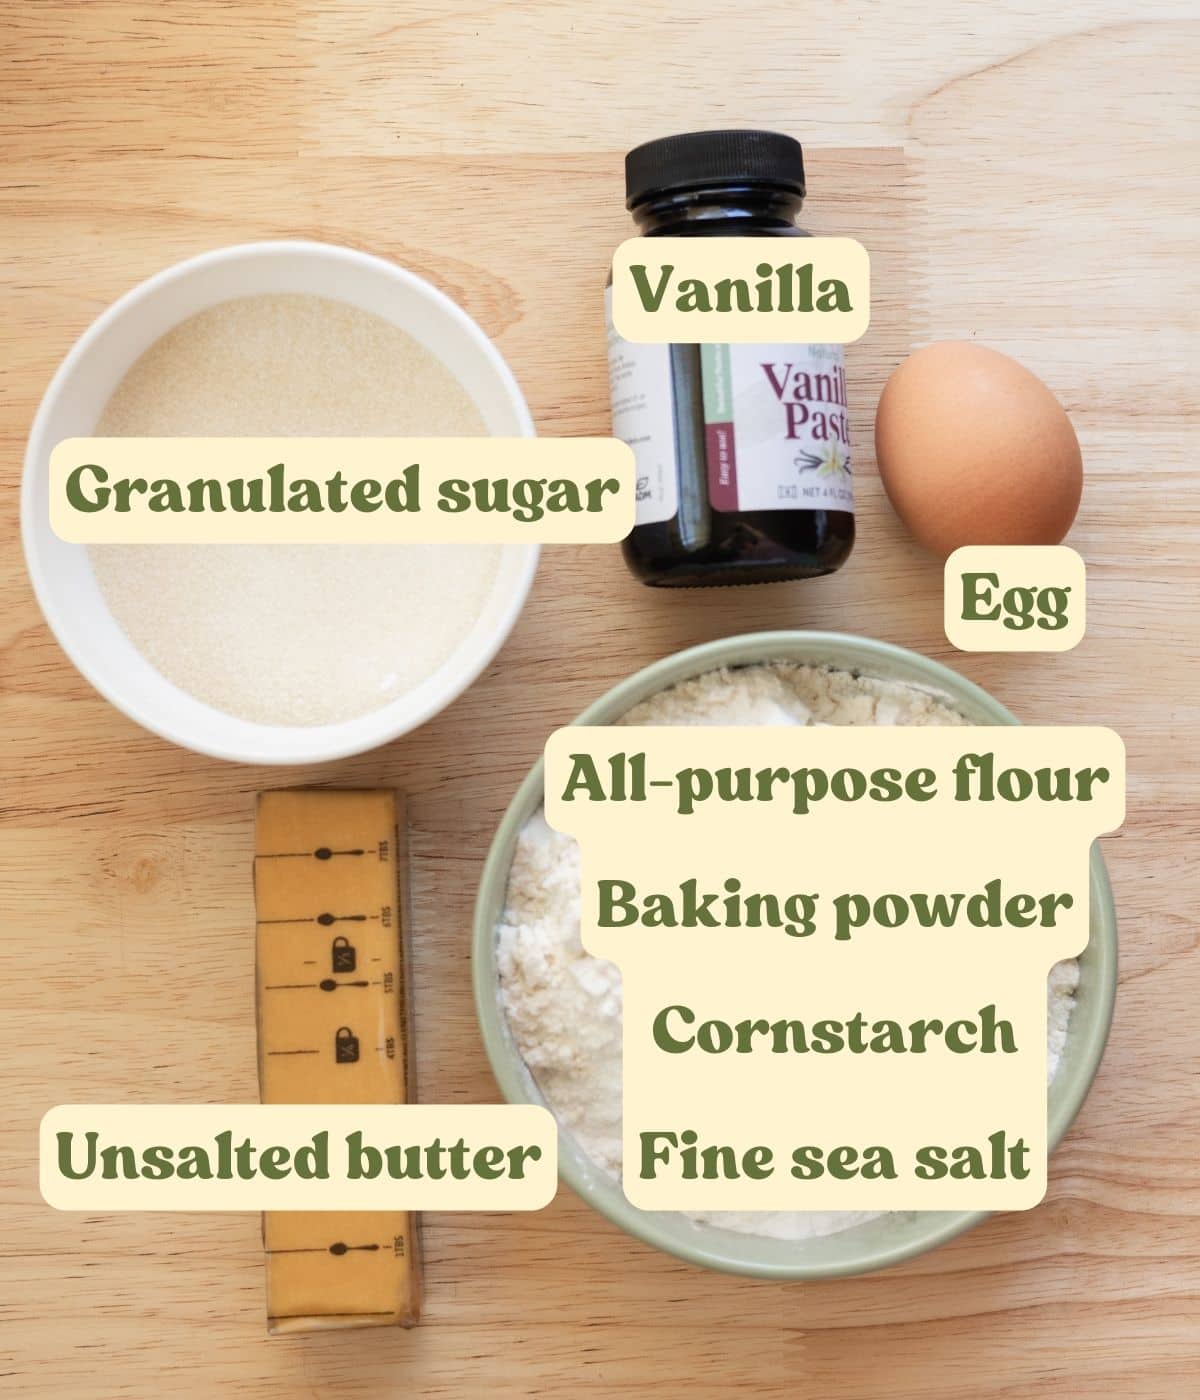
- You’ll need softened unsalted butter, which you’ll cream with granulated sugar until light and fluffy.
- I’ve been using vanilla paste lately because of all the pretty specks of vanilla beans! But if you don’t have it on hand, you always can swap it 1:1 for vanilla extract.
- Cornstarch helps the cookies hold their shape while baking. It also keeps them soft and tender!
For decorating (royal icing & edible pens):
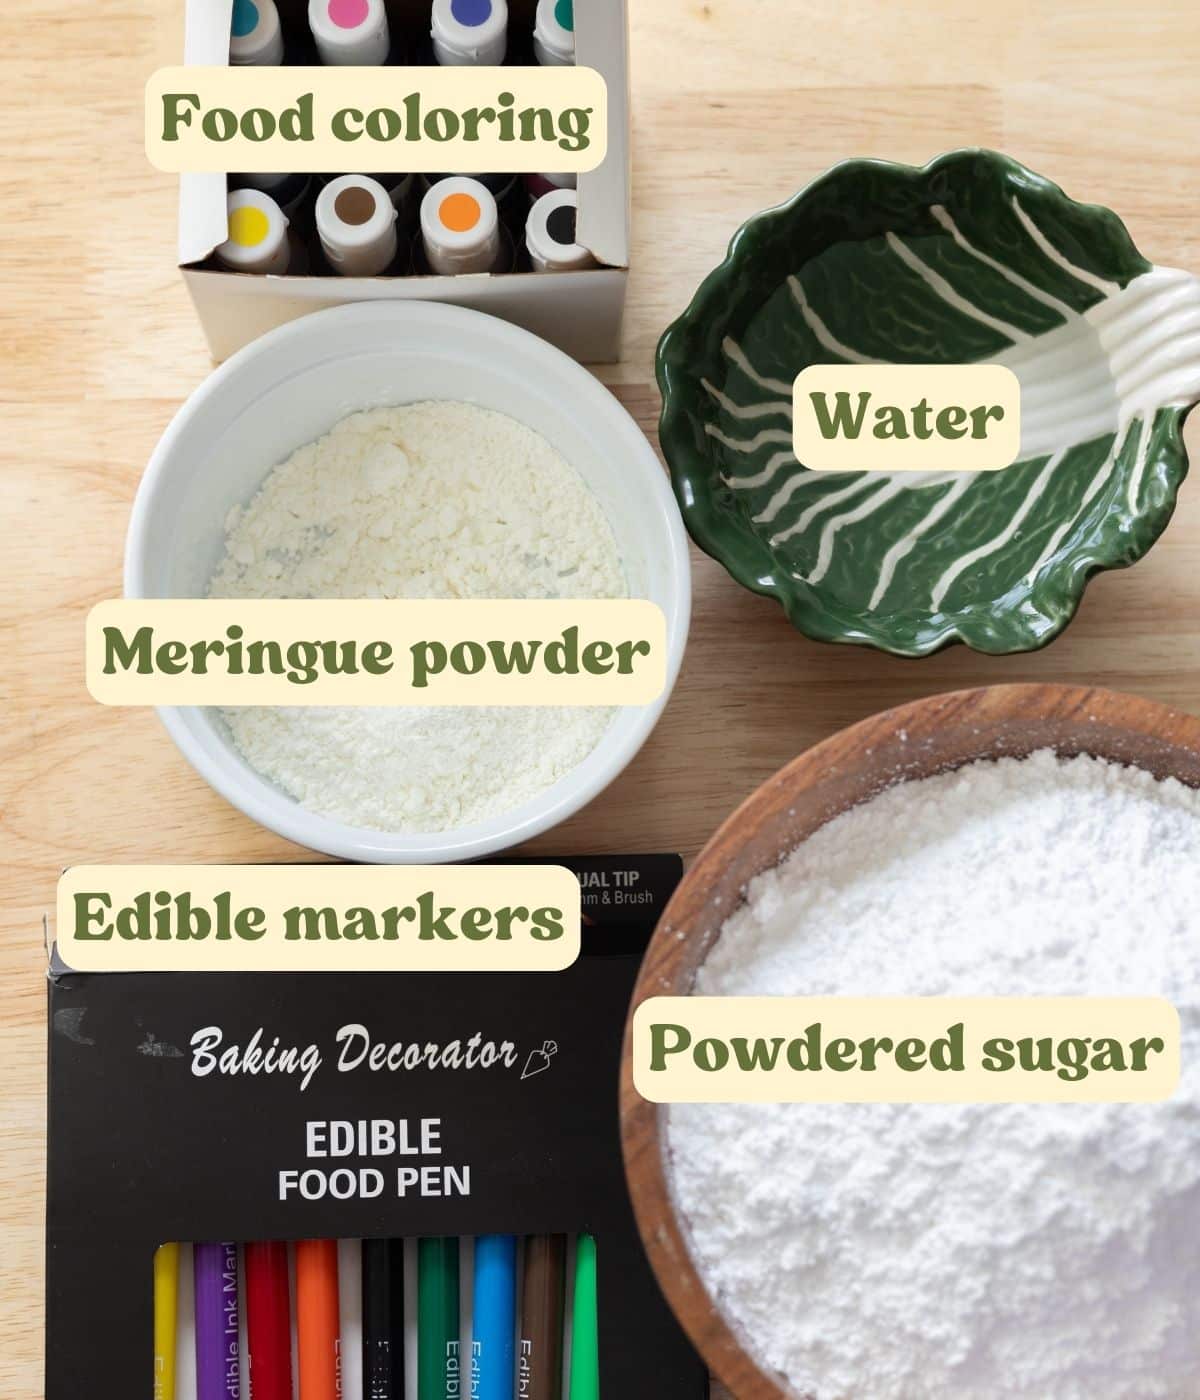
- Make sure to use meringue powder, which is very different than egg white powder! Meringue powder contains additives that help create consistent, stable icing.
- Powdered sugar provides sweetness and helps control how thin or thick you want your icing to be.
- I like using gel food coloring to dye my icing because it is much more potent than liquid food coloring. You only need a little to go a long way!
- To write the messages, you can use your royal icing or edible markers!
For the full list of ingredients and measurements, see the recipe card below.
💡 Baking Tips
- Weigh your ingredients! One of my favorite kitchen tools is a kitchen scale because it’s more accurate than measuring by volume. If you use cups, spoon the flour in gently, then level it with a knife or spatula.
- To minimize sticking, lightly flour your cookie cutter before using! I also like to slide an offset spatula underneath the cut-out cookie when transferring to my lined baking tray.
- Keep cut-out shapes in the freezer. The colder the cookie dough, the more they will hold their shape in the oven!
How to Make Valentine’s Day Heart Cookies
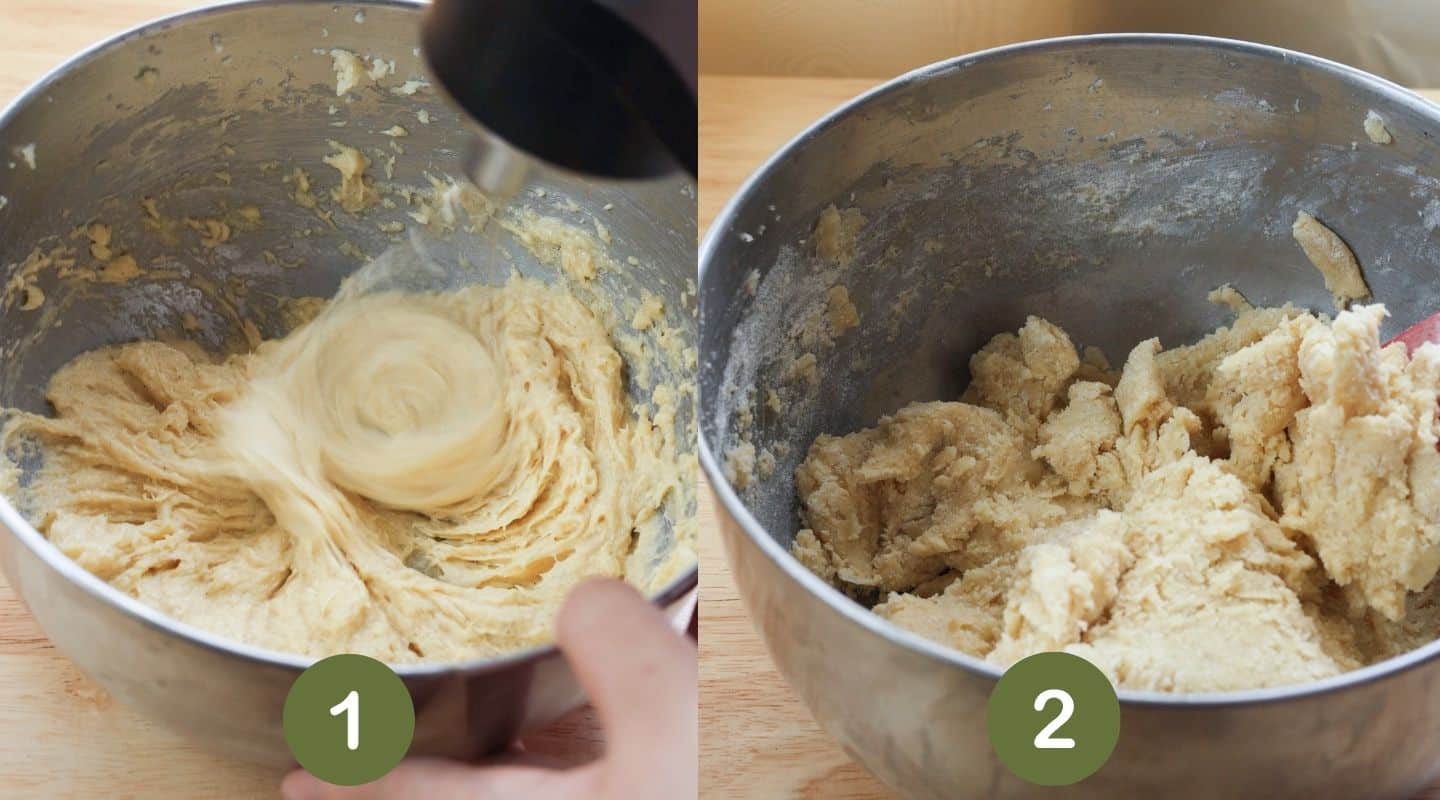
Step 1: Cream softened butter and sugar until light and fluffy, about 3-4 minutes. Mix in egg and vanilla until combined (Image 1). Add dry ingredients, mixing until there are no more dry spots (Image 2).

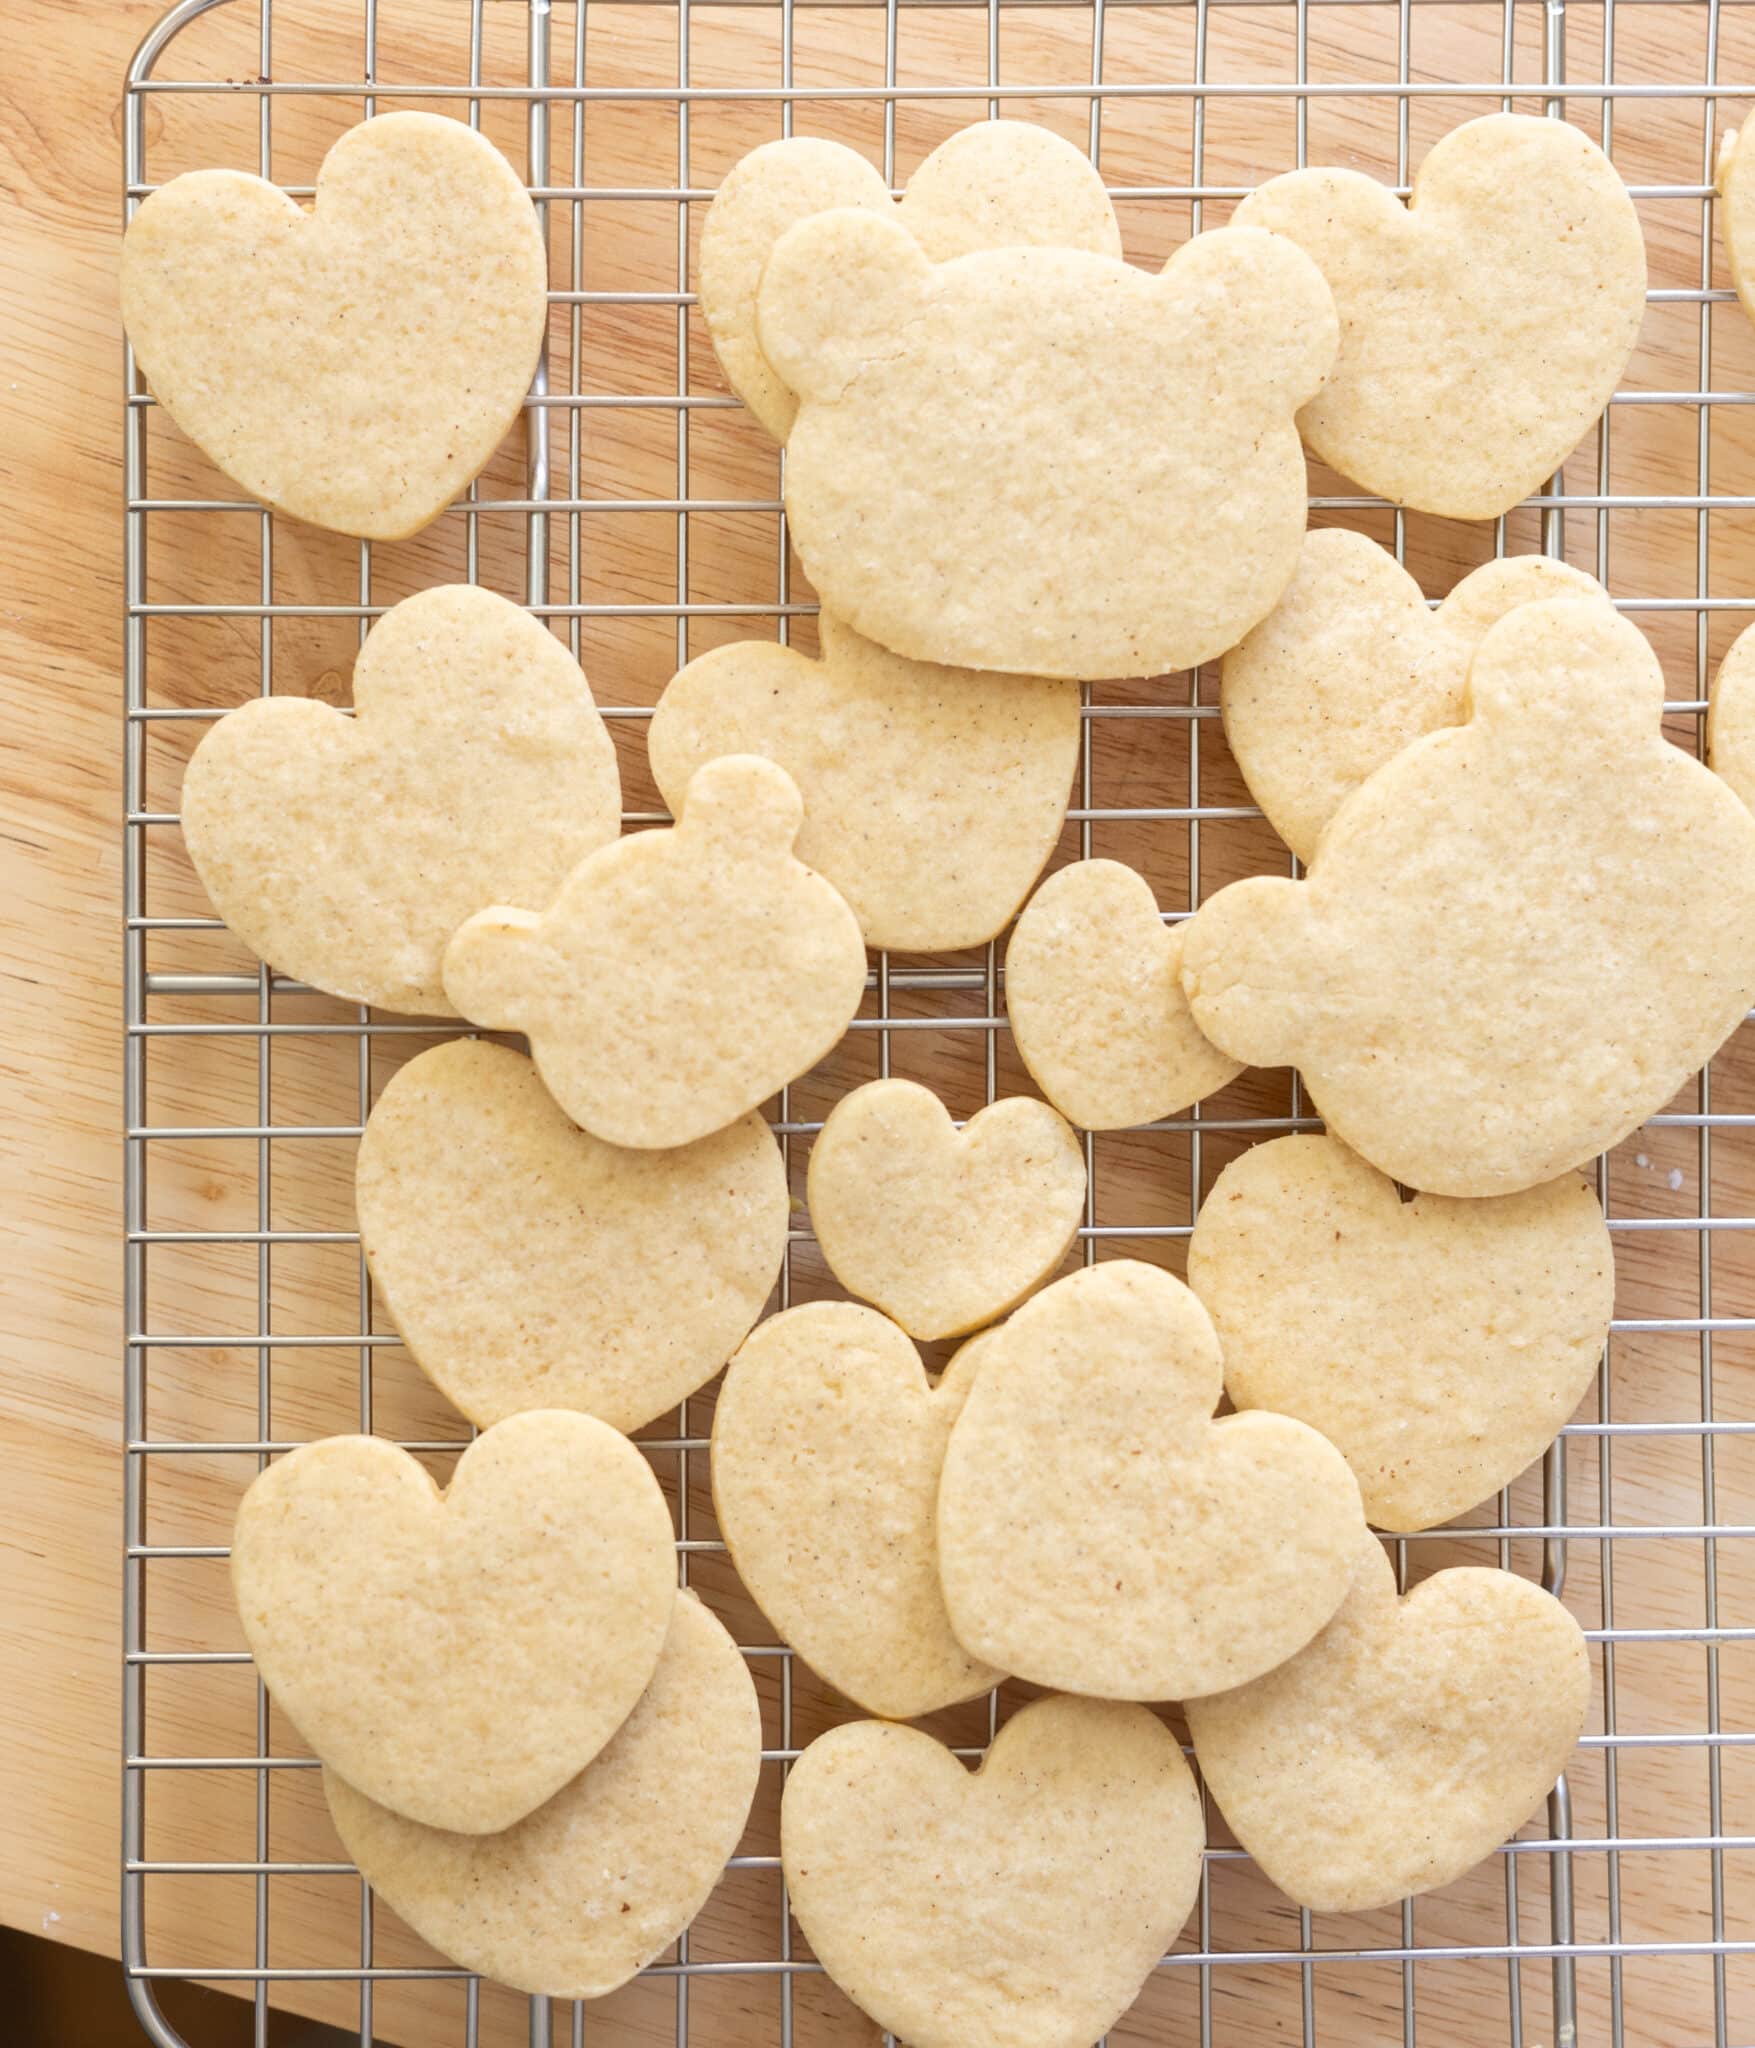
Step 2: Roll cookie dough out between two pieces of parchment or wax paper until ¼-inch thick (Image 3). Transfer the entire stack to a baking tray and freeze for about 15 minutes. Remove top layer of paper, then lightly stick it back on. This helps loosen the dough when you remove cut-out shapes. Flip entire stack over to completely remove the other layer of parchment paper. Cut out hearts and place on baking sheet, about 3 inches apart (Image 4). Re-roll extra dough and repeat.
The colder the dough, the more they will hold their shape in the oven, so feel free to freeze the cut-out shapes before baking! Bake at 350°F/177°C for 11-13 minutes, or until edges are set. Allow to cool on baking sheet for 5 minutes before transferring to wire rack to fully cool.
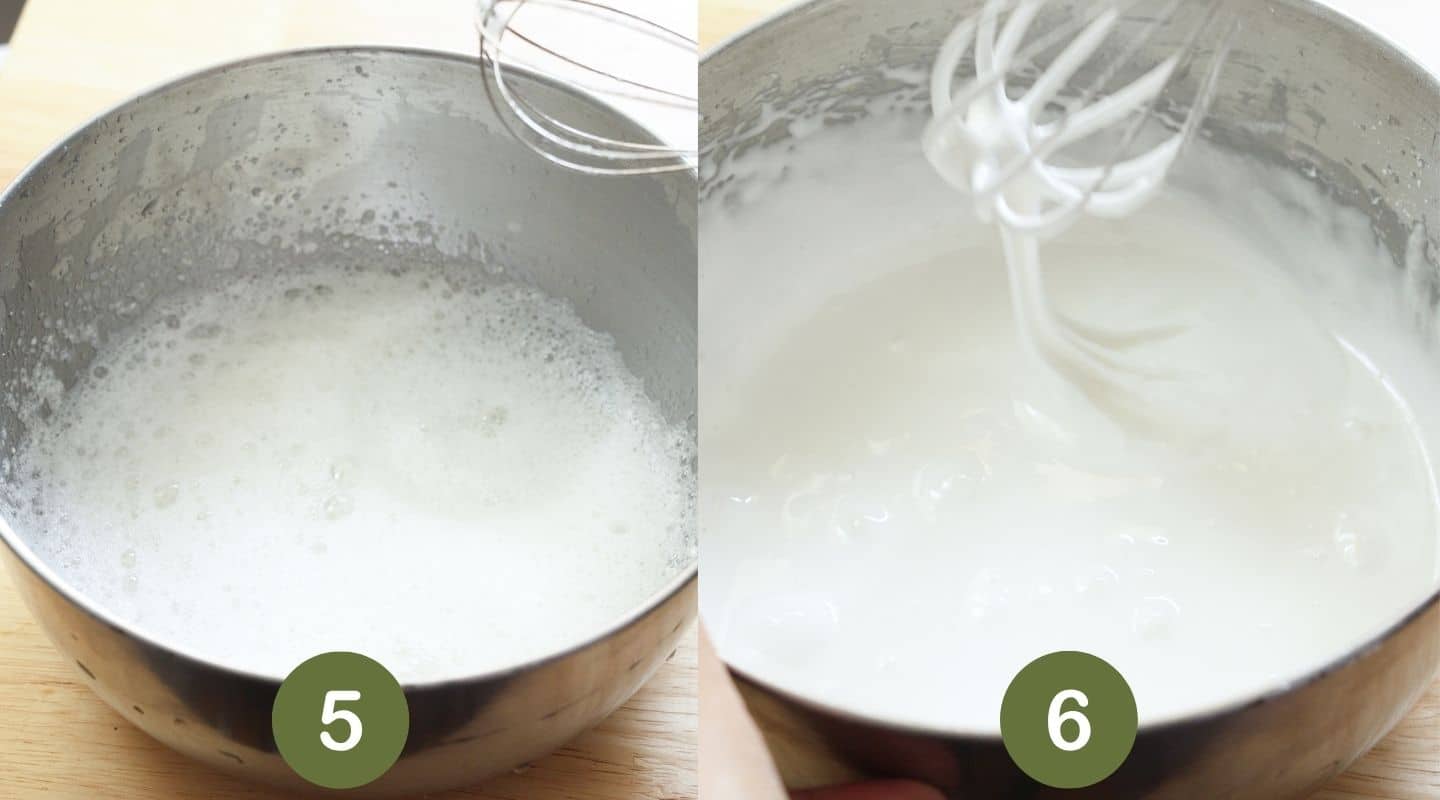
Step 3: In a large bowl, whip meringue powder and water on medium speed until very frothy, about 2-3 minutes (Image 5). Gradually add powdered sugar while mixing on medium low. Once all of the sugar is incorporated, add flavoring and salt. Whip on medium speed until thickened, about 3-4 minutes. If it’s too thin, try whipping longer or mixing in extra powdered sugar (Image 6).
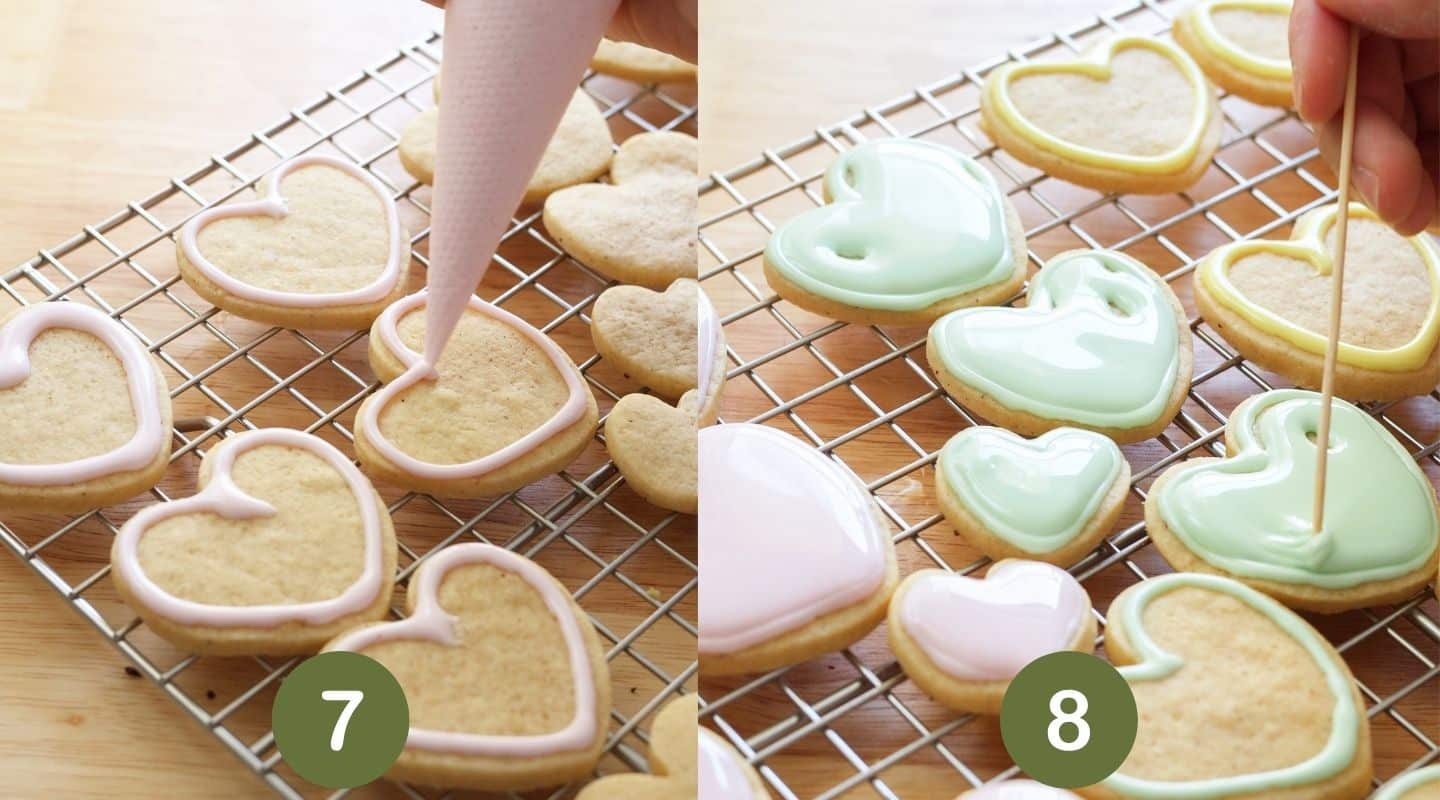
Step 4: Split royal icing into different bowls and dye using gel food coloring. Pipe outlines on all cookies (note: if you want to avoid obvious border lines, use a much finer tip than I am!) (Image 7). Flood all of the cookies with icing and use a toothpick to help move icing around and pop any bubbles (Image 8). Leave cookies uncovered at room temperature until dry, between 8-24 hours. Once fully dry, use edible markers to write custom messages!
For full instructions, see the recipe card below.
✍🏻 Conversation Heart Message Ideas
- If you want to be sweet: besties, love u, XOXO, miss u
- If you want to be funny: no., wtf, boy bye, u smell (good), nvm

Storage
- Room temperature: Store cookies in an airtight container at room temperature for up to 5 days.
- Freezing instructions: Freeze cookies in an airtight container for up to 3 months. Let thaw in container at room temperature. Please keep in mind the icing and edible marker may unfortunately bleed as the cookies thaw!
😋 More Cookie Recipes


Did you try this recipe?
Please leave a review & share it with me on Instagram, Facebook, Tiktok, or Pinterest!
Thank you so much! -Bianca ❤️
📖 Recipe & Video

Conversation Heart Cookies
✉️ want to save this?
Equipment
- medium mixing bowl for dry ingredients
- large mixing bowl for cookie dough
Ingredients
Dry Ingredients:
- 1 ¾ cup (218.75 g) all-purpose flour
- 1 tablespoon (8 g) cornstarch
- 1 teaspoon (4 g) baking powder
- ½ teaspoon (3 g) fine sea salt
Wet Ingredients:
- ½ cup (113.5 g) unsalted butter softened
- ½ cup (100 g) granulated sugar
- 1 tablespoon (13 g) vanilla extract or paste
- 1 (50 g) egg room temperature
Royal Icing:
- 2 tablespoons (18 g) meringue powder I also love the brand LorAnn!
- ¼ cup (59 g) water
- 2 cups (240 g) powdered sugar
- ½ teaspoon (2 g) vanilla extract or ⅛-¼ teaspoon almond, mint, etc. you can also add lemon juice or zest!
- pinch fine sea salt
- gel food coloring I used pink, yellow, and green
Decorating:
Instructions
For the cookie dough:
- In a medium bowl, stir together all of the dry ingredients: 1 ¾ cup all-purpose flour, 1 tablespoon cornstarch, 1 teaspoon baking powder, and ½ teaspoon fine sea salt.
- In a large bowl, use an electric mixer to cream the softened ½ cup unsalted butter and ½ cup granulated sugar until light and fluffy.
- Mix in 1 tablespoon vanilla and 1 egg until smooth.
- Dump in all of the dry ingredients. Fold using silicone spatula until no dry spots remains.
Roll out dough:
- Now, you will make a "parchment stack". The bottom layer will be a large piece of parchment paper, the cookie dough in the middle, then parchment paper on top. This will make rolling out the dough much easier + mess free.Lay large piece of parchment paper down on work surface. Plop on all of the cookie dough, then lay another piece of parchment on top of it. Use a rolling pin to roll out the dough into a large rectangle, until dough is about ¼-inch thick.
- Transfer parchment stack to a baking tray and freeze for about 15 minutes. This will make cutting out shapes easier.While the cookies are freezing, feel free to make the royal icing ahead of time!
Cut out & bake cookies:
- Preheat the oven to 350°F/177°C. Line two baking sheets with parchment paper.
- This step will help loosen the cookie dough from the parchment paper layers. So when you cut out dough pieces, the dough doesn't stick to the paper and is easier to transfer to your lined baking tray.Peel off top parchment paper, then lightly stick it back on. Flip the entire parchment-cookie dough-parchment stack over so you can completely peel off the bottom parchment paper.
- Use cookie cutters to cut out heart shapes. Transfer cookies to baking sheets, about 2-3 inches apart. The cookies will not spread much while baking.Tip: Lightly flour your cookie cutter to minimize any sticking. When transferring cut-out cookies to your lined baking sheet, you can slide an offset spatula underneath the cookie to easily pick it up. If the dough is getting too soft, pop it back in the fridge or even the freezer for a few minutes.
- Knead together any dough scraps, roll out, and cut out more cookies.Tip: The colder the cut-out cookies, the more they'll hold their shape when baking! Feel free to freeze your cut-out shapes for 10 minutes before popping them in the oven.
- Bake for 11-13 minutes, or until edges are set and very lightly golden. Let cool on pan for about 5 minutes, then transfer to wire rack to fully cool.
Make royal icing & decorate:
- In a large bowl, add 2 tablespoons meringue powder and ¼ cup water. Mix on medium speed until very frothy, about 2-3 minutes.
- While mixing on medium-low, gradually add 2 cups powdered sugar. Once all of the powdered sugar is fully incorporated, add ½ teaspoon vanilla extract and pinch fine sea salt.
- Whip on medium high for about 3-4 minutes until thickened and white. If the consistency is too thick for your liking, add a few drops of water at a time. If it is too thin, try whipping the mixture longer or adding in more powdered sugar.Note: For a royal icing consistency perfect for both lining and flooding, drag your whisk through the icing. It should smooth back into an even surface within 15–20 seconds.
- Now it's time to color your icing. Divide icing into bowls. Work with one color at a time, covering the remaining bowls with damp paper towels to prevent the icing from drying out.**As dyed royal icing dries, the color does deepen a few shades darker. So if you're going for pastels, go a bit lighter than you normally would. Stir in gel food coloring until combined.
- To minimize air bubbles in your decorated cookies, let icing rest in the bowl for about 15 minutes, so any trapped air can rise to the surface. Pop bubbles with a toothpick.
- Transfer icing to piping bags and cut a small tip. Pipe on outlines to all of your heart cookies first, then go back in to flood them.
- Let cookies dry on a wire rack at room temperature for 8-24 hours. Once the icing is fully dry, write on custom messages using edible food markers. Enjoy!Here are custom message ideas, in case you need inspo!If you want to be sweet: besties, love u, XOXO, miss u If you want to be funny: no., wtf., boy bye, u smell (good), nvm
Notes
- Room temperature: Store cookies in an airtight container at room temperature for up to 5 days.
- Freezing instructions: Freeze cookies in an airtight container for up to 3 months. Let thaw in container at room temperature. Please keep in mind the icing and edible marker may unfortunately bleed as the cookies thaw!